2 Low UnLoc From BD Diesel Performance

BD’s kit 1030705 2 Low UnLoc for late model Ram trucks

Installing BD Diesel Performance’s 2 Low UnLoc Differential Kit For Fourth Generation Rams

Moving Slower

Reversing and maneuvering large trucks, trailers, or other big outfits can be challenging and even stressful for those lacking skill or confidence. One way to mitigate the reduced visibility and risk of hitting something and causing property damage, or worse, is to move slowly. This is obvious to most everyone, yet the slowest transmission gears, first and reverse, are still tall for creeping around campsites, parking lots, and other narrow spaces. Adding grades and/or tight turns can increase the gearing deficiency. Excessive slipping of a clutch or loading of a torque converter is not a perfect solution, but sometimes a necessary evil. Done improperly with too much rpm, or repeatedly, wear or a mechanical failure may be the eventual reward.

Transfer Case Auxiliary Gearboxes

Four-wheel-drive (4WD) trucks have become extremely popular in recent decades, even with folks that rarely, if ever, venture off-pavement. The low gearing in most transfer cases lives a very lonely life. The point of low-range is to go slow in technical situations, with the added benefit (or impediment) of powering the front tires. Using low-range increases torque and helps the engine move loads at slower speeds, even at low idle. Some savvy and careful drivers will shift into 4WD-low to access the gears for backing and maneuvering, but this is not without consequence.

Traditional part-time transfer cases split engine torque equally between the front and rear axles and are designed for slippery surfaces. A slipping tire can release the inherent bind that occurs at the transfer case between the front and rear shafts. When used on high-traction surfaces that don’t allow dissipation, there is a possibility of drivetrain damage, though the risk is small if the steered tires remain straight and distances are short. Once the front tires are turned, which dramatically increases the need for differential action, drivetrain windup will result. This energy is transmitted to and felt in the steering wheel, which will move or jerk in the driver’s hands as the drivelines complain. (Full-time 4WD systems use a center differential, avoiding the conflict between the front and rear drive systems.)

Two-Wheel-Drive Low

When most 4WDs had manual-locking front hubs, simply keeping the hubs in their normal, unlocked position allowed shifting into low range without connecting the front wheels to the axles. This works, and I did it for decades. Drivers should be careful and smooth because all of the engine’s torque, now multiplied by the transfer-case gears, is going to only one driveshaft, not two.

Manual hubs on Dodge Turbo Diesels disappeared with the First Generation in 1993. Second Generation trucks have a vacuum-operated front axle disconnect system that allows a relatively simple bypass to use low-range 2WD. BD Diesel Performance still makes a kit for these Second Generation Dodge trucks. After Dodge eliminated the disconnect system in favor of constantly driving the front axles, no simple solution existed; the only real option was to add manual hubs. With the return of front axle disconnect on heavy-duty Rams in 2013, now electrically-activated, preventing 4WD from engaging while accessing the low-range gears is again easy.

DISCLAIMER—As always, use extreme care and (un)common sense. Operate all machinery with due care, while also accepting the inherent responsibility that comes with any modification. You may be your own warranty station.

2 Low UnLoc

Spring 2017, BD Diesel Performance introduced their two-wheel-drive low solution, the 2 Low UnLoc kit for 4WD 2009–2017 1500, 2014–2017 2500, and 2013–2017 3500 Rams. BD sent me one of the first units.

One end of the harness has two OEM-quality connectors that go inline at the Drivetrain Control Module, another has ports for the two included relays, and a third connects to the supplied switch. My friend Phil and I installed the kit on his 2014 2500 with 35,000 miles on the clock. He tows a 24-foot travel trailer.

Plug-and-play harness makes for an extremely easy installation

It’s So Easy

The 2 Low UnLoc for late-model axle disconnect trucks is a simple add-on. BD’s directions were followed almost to-the-letter because I found no way or need to improve the process. The one slight deviance was drilling the switch hole.

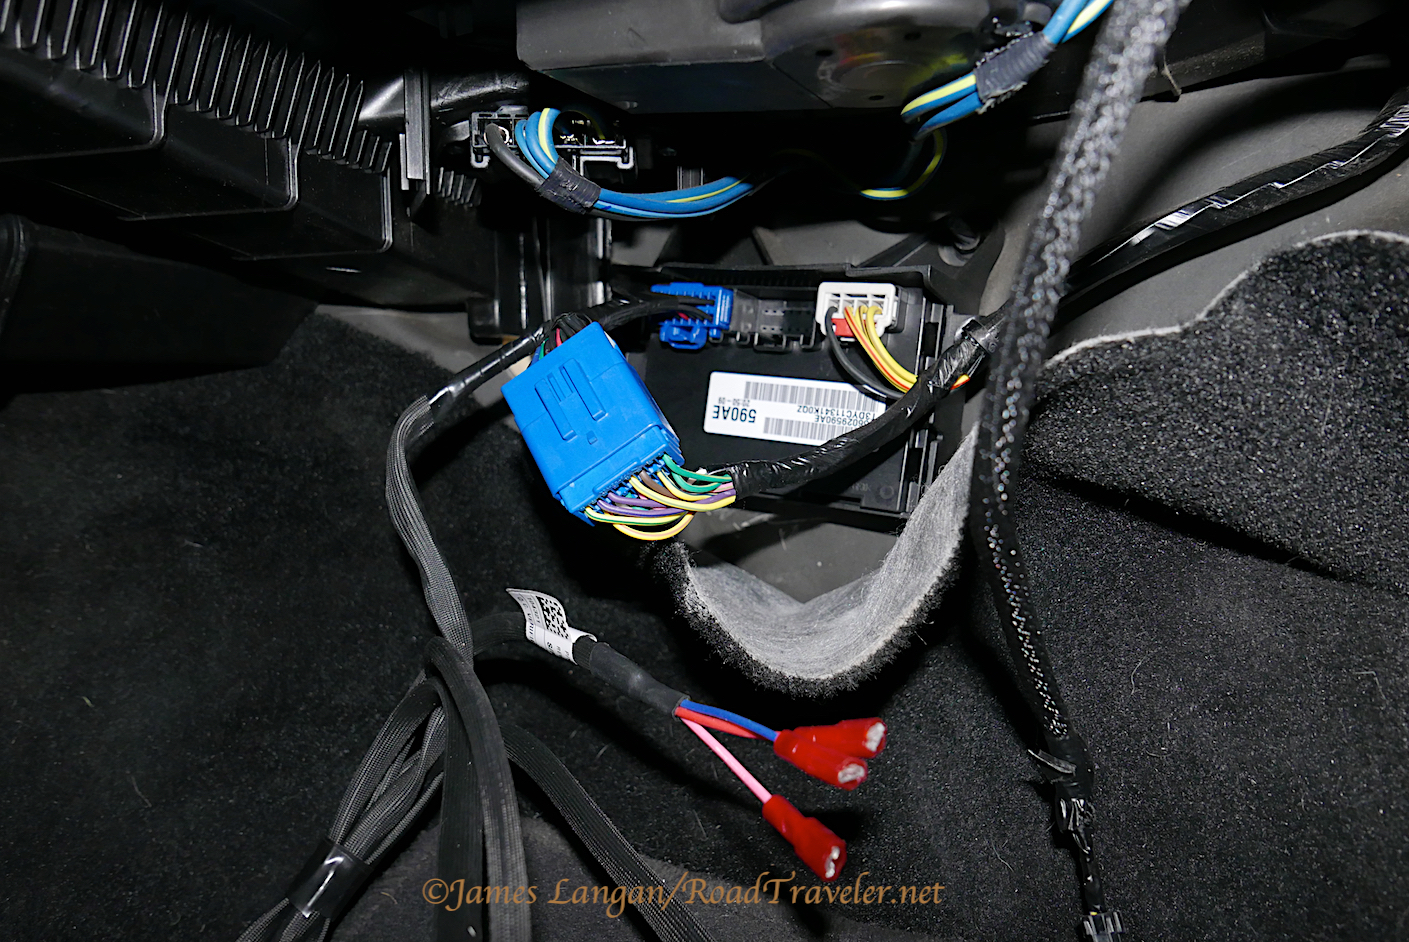
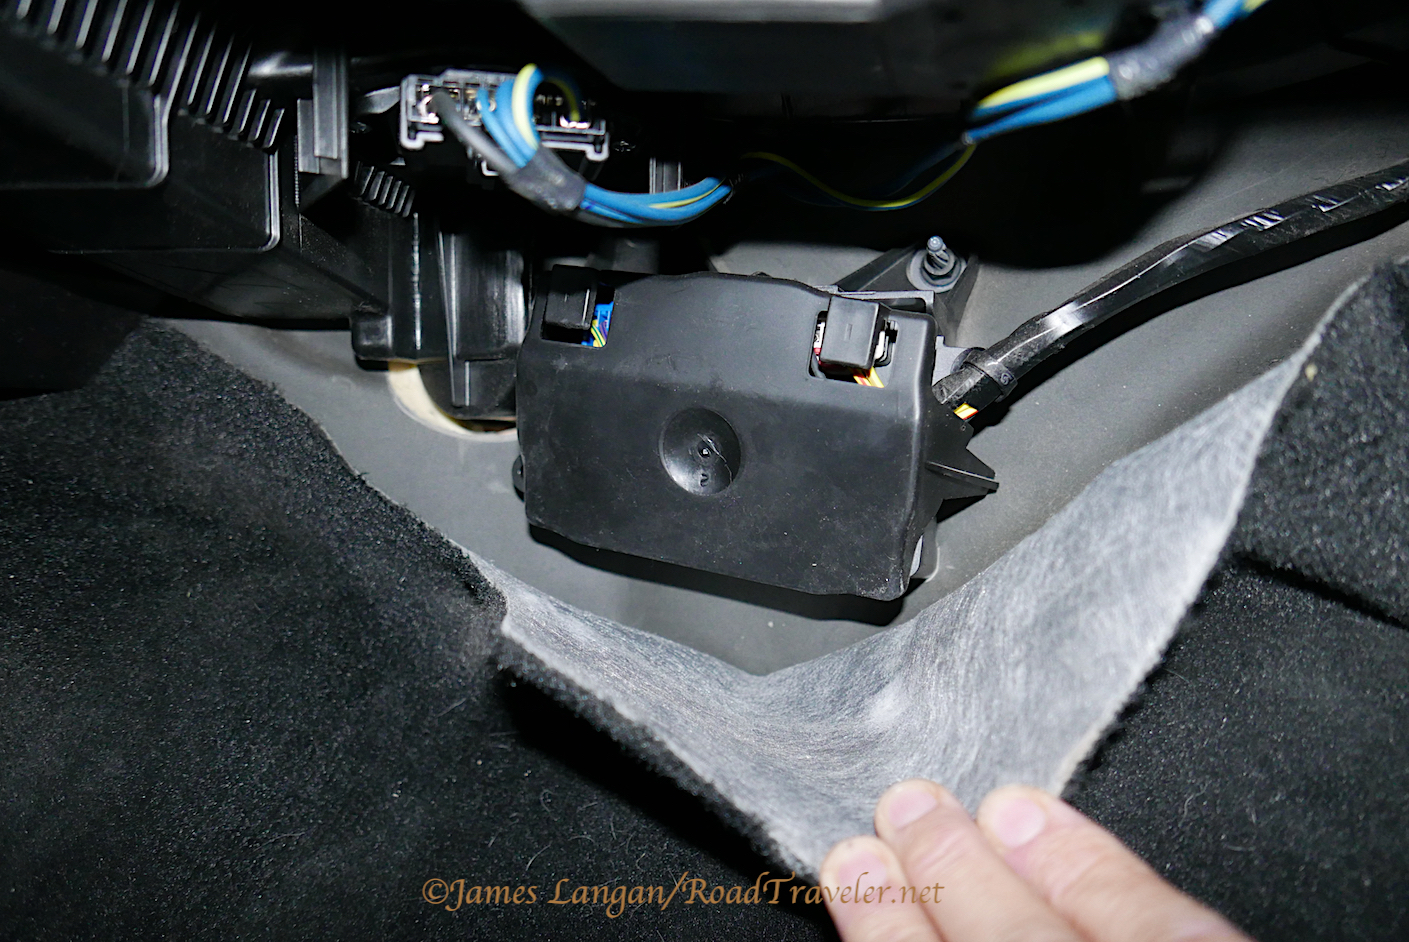
Removing three push-in retainers for the carpeted panel below the glove box allows pulling the carpet rearward, which exposes the drivetrain control module. Unclipping the black plastic cover exposes the blue factory male connector that is replaced with BD’s. The OE male plug snaps into BD’s female connector. Re-clipping the drivetrain control module cover was only a minor struggle with the extra BD connector inside.

There is plenty of harness to locate the relays far from the drivetrain control module if desired, but we secured them below module with mounting tape. The last thing to do was to make a hole for the switch.
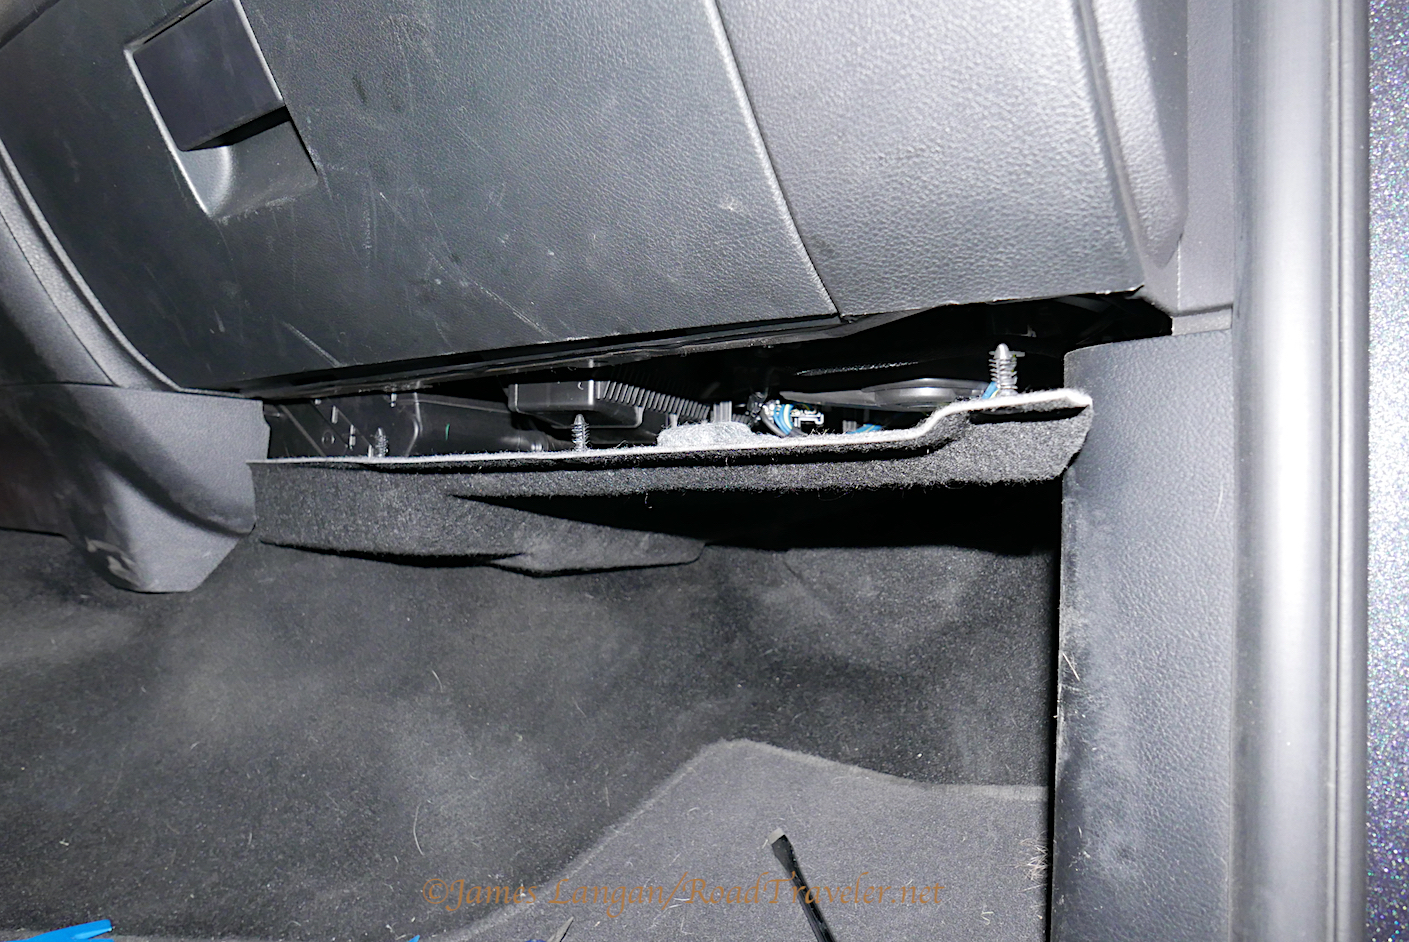
First step, remove carpeted panel below the glove box
Pulling the passenger side carpet exposes the drivetrain control module
BD’s harness placed inline at the drivetrain module

Pulling The Center Stack Cover

Removing the center dash cover that surrounds the radio and HVAC control is a simple task, though like doing anything for the first time there can be trepidation. The first step is the most critical and can be easily overlooked by the uninitiated.

A plastic liner snaps into the tray above the radio and must be removed to expose two TORX T20 screws. Remove these two screws first and replace last. The remainder of the piece is held with several snap-in clips, mostly around the perimeter, and it is simply pulled away at the edges. I use my fingertips and/or a plastic interior trim tool. After the surround is loose, a few connectors on the rear must be unclipped before the piece can be completely removed.

Drilling

Phil and I started this 2 Low UnLoc project by removing the dash center stack cover, which confirmed we could use the blank spot below the cubby on the right. From the front it appeared that the matching blank space on the left could be used instead. This was not the case on Phil’s truck, as there was a connector on the back. These little panels are great locations for switches, plus they are replaceable, secured with four Philips screws on the rear.
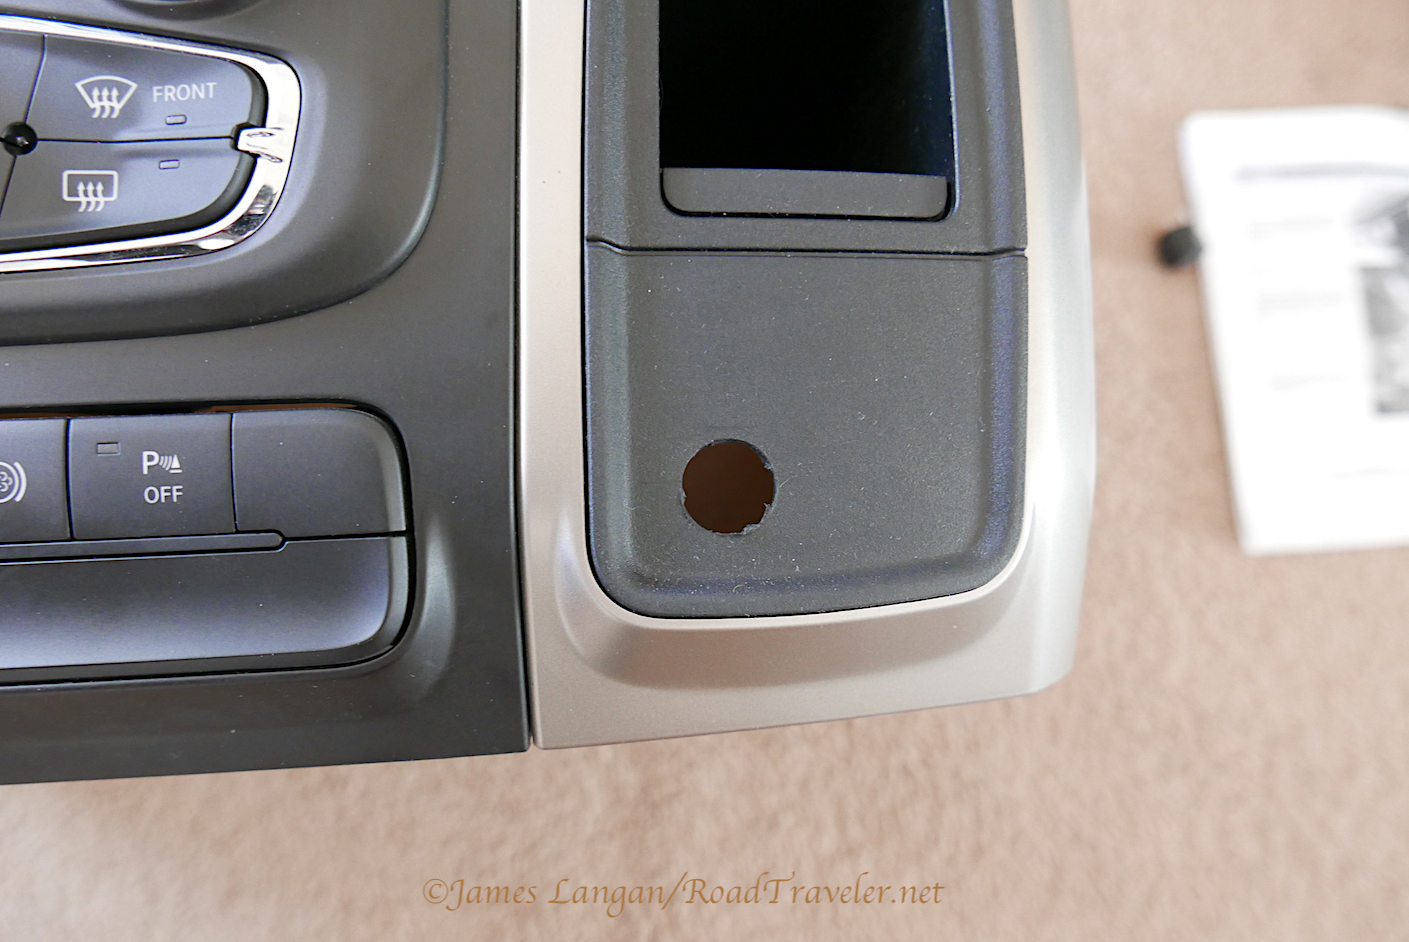
Rocker switch requires a large hole

BD recommends using a stepper drill bit to make the hole for their lighted rocker switch. I don’t own a stepper bit, but I would have been concerned about going too deep and making the hole too big. The largest bit in my toolbox is a 5/8”. After stepping up to this size we were close, but the hole was still slightly undersized. Carefully enlarging the hole with the same 5/8” bit worked; I stopped while the rocker was still a very tight, interference fit. A small file was used to cut a notch for the locating tab on the left side. Because of the snug fit, we were unable to use the 2WD LOW sticker BD provides with the kit.
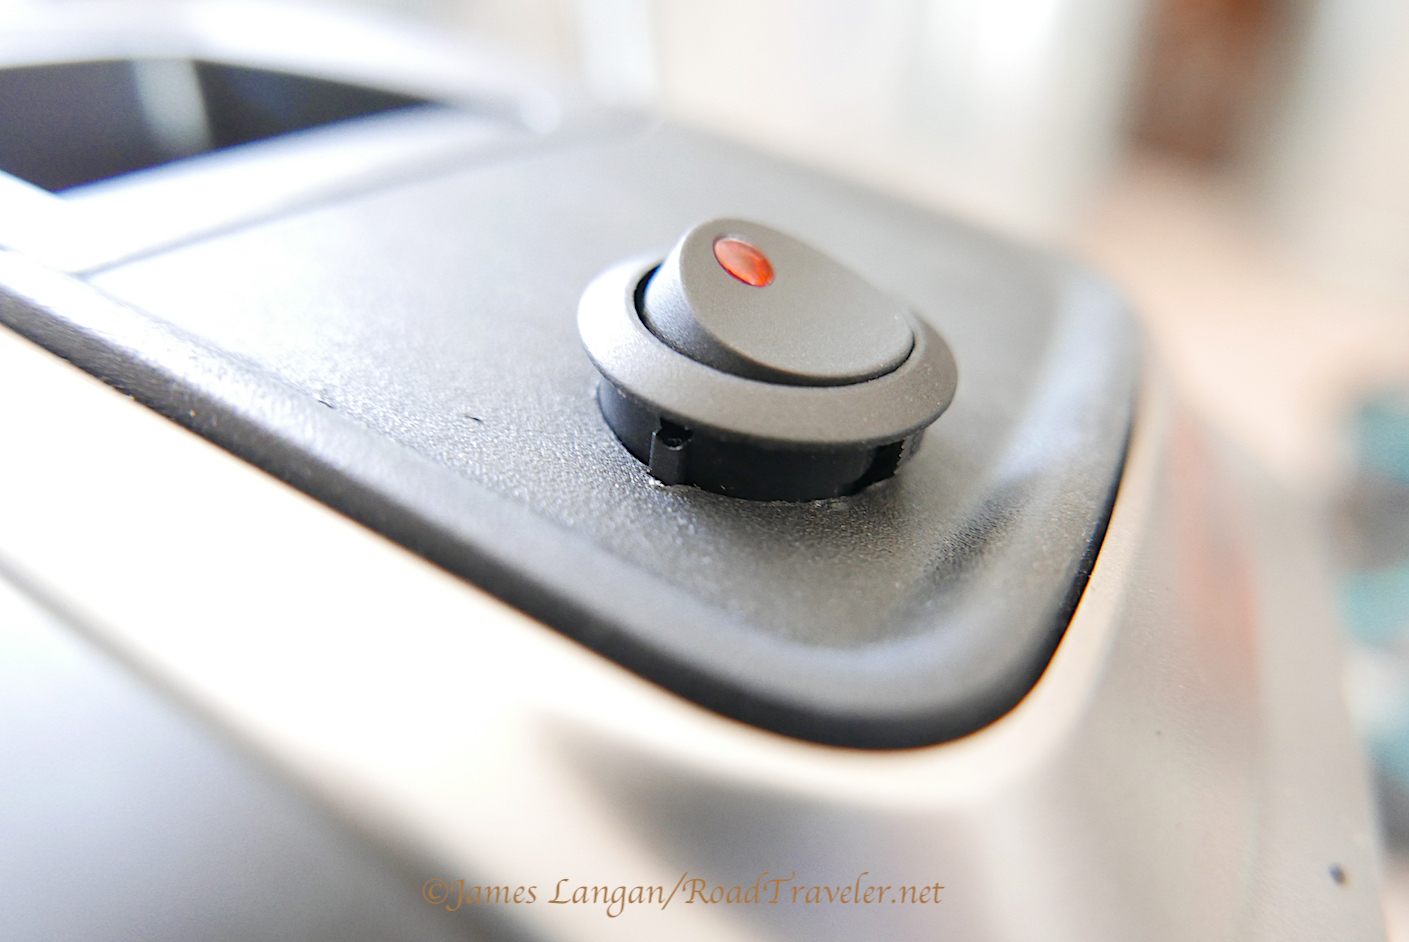
Notched left side of hole for locating tab

Function Testing

Before pushing the rocker switch into its tight, final resting place we loosely connected the three color-coded wires and tested the 2 Low UnLoc system. The operating procedure requires rotating the rocker switch to the on position first, then moving the transfer case selector or lever to low-range. The red light on the rocker will illuminate, indicating that front axle engagement has been bypassed, and BD’s 2 Low UnLoc is active. To deactivate, the sequence is reversed; the transfer case is shifted back to two-wheel-drive high-range, then the switch is turned off.
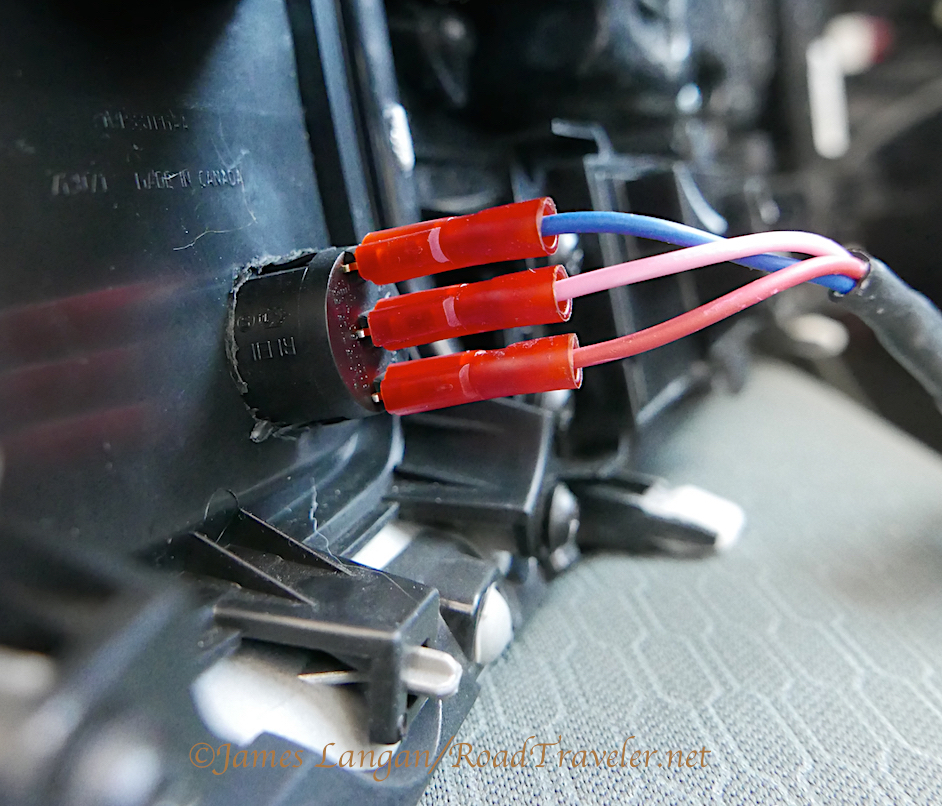
Color-coded harness wires for the switch
After rotating the rocker, and shifting the transfer case, the switch light illuminates

We reassembled everything and tested the feature again. It worked. Phil and I both love the BD 2 Low UnLoc and think the $148 price is worth the functionality and ease of installation. Geno’s Garage stocks the 2 Low UnLoc kit, and reports they have been selling well.

James Langan

Copyright James Langan/RoadTraveler/Turbo Diesel Register. All Rights Reserved.

 A version of this article was also published in the Turbo Diesel Register magazine.

Sources:

BD Diesel Performance: dieselperformance.com, 800-887-5030

Geno’s Garage: genosgarage.com, 800-755-1715 
 

Zamp Solar Flexi Flat 100 watt panels

Zamp Solar TDR96


Source: Zamp Solar, zampsolar.com

Copyright James Langan/RoadTraveler/Turbo Diesel Register magazine. All Rights Reserved.

White Knuckle Off Road Hitch Step

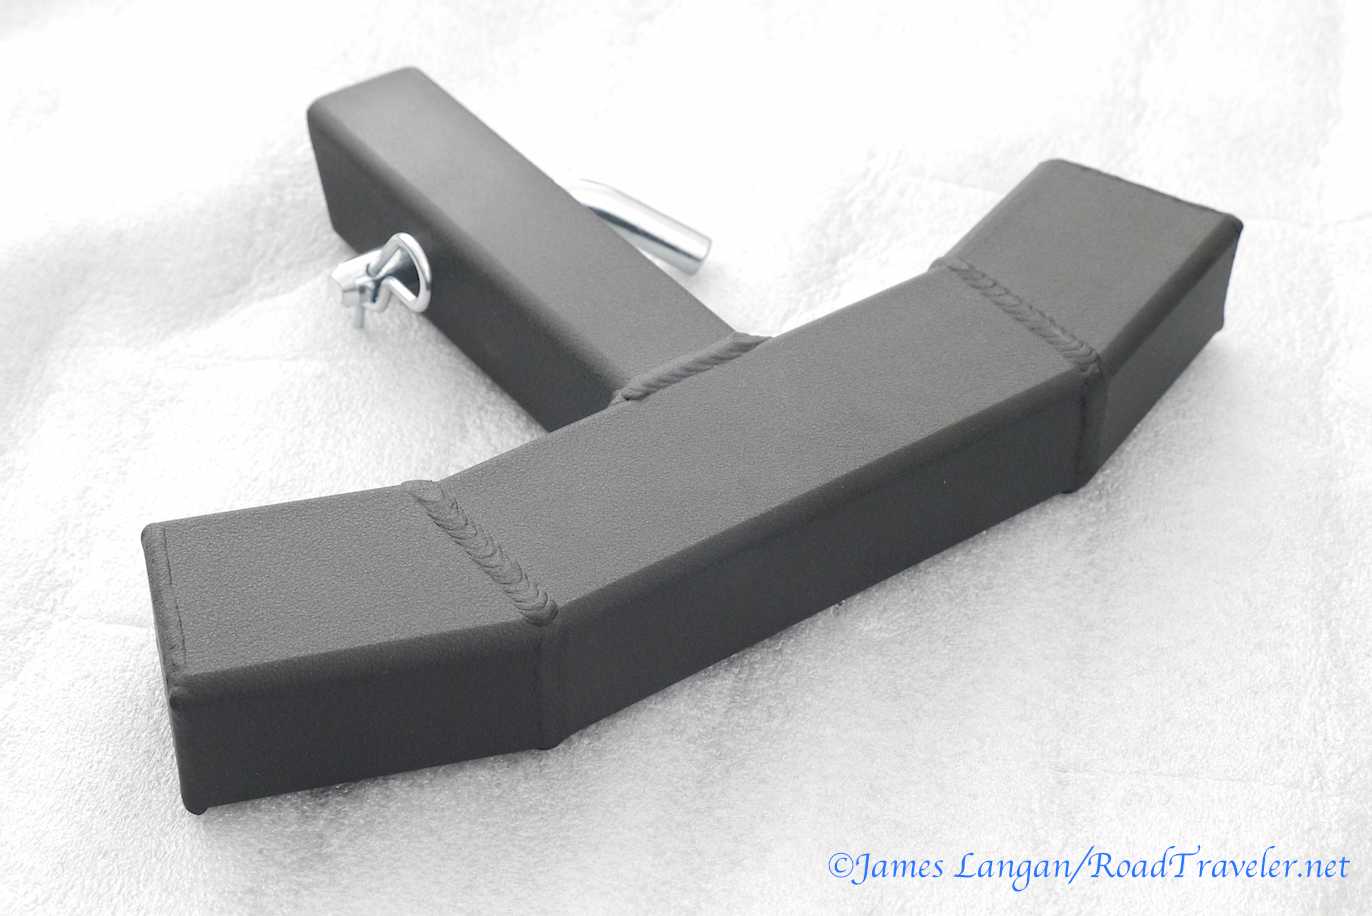
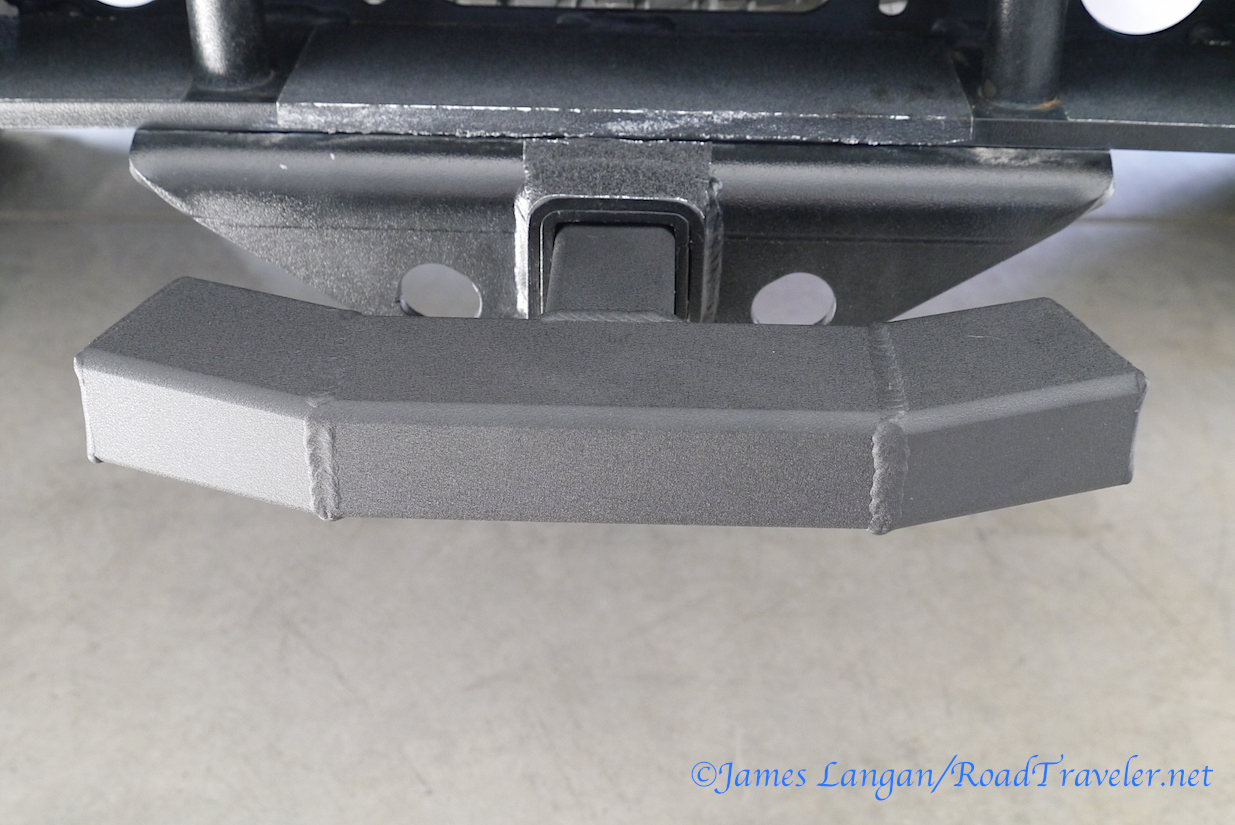
Heavy Duty, 4×4 trail ready, White Knuckle Off Road hitch step

Another accessory for the road ahead. White Knuckle Off Road’s heavy-duty Hitch Step. While I’m capable of entering and exiting the Hallmark camper with nothing more than my Reunel step-bumper, and do so occasionally, it’s nice to have something to bridge the 40″ to the door’s threshold. Typically that’s one of two plastic folding steps, one that is a bit shorter but travels flat, or another that is bulkier but more stable. Wet, slippery, and messy boots, whether from snow or mud, add another dimension, and wind can move steps from their preferred positions (I use bungees). Multiple roadside stops during long road trips can make folding steps less convenient to deploy and store.

Beefy, 3/16″ thick tubing

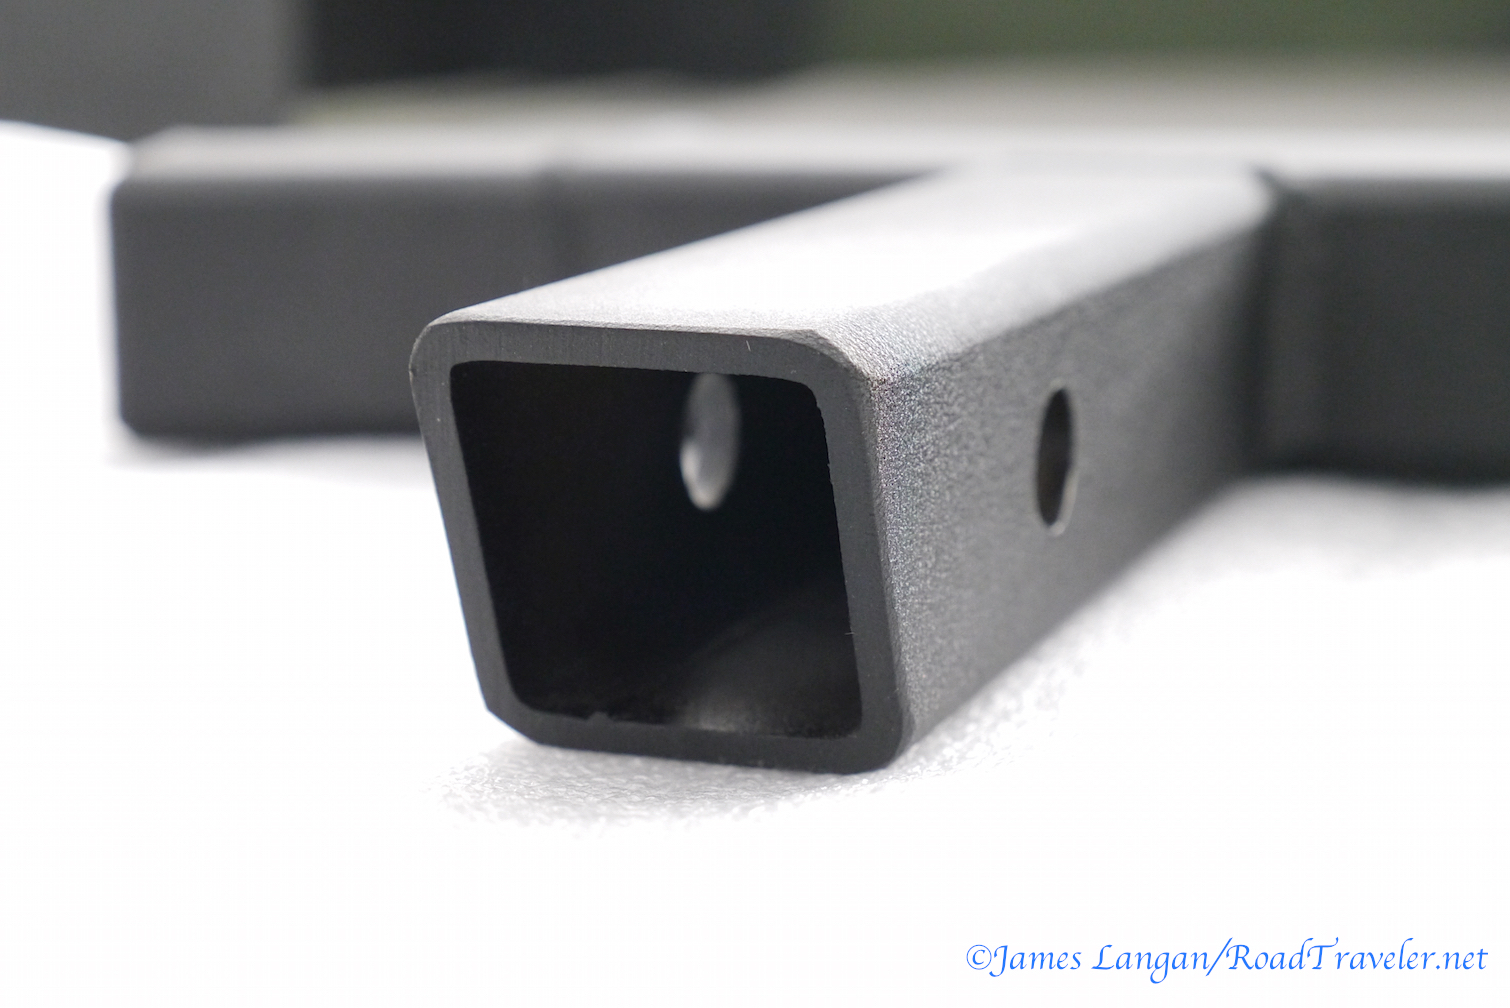
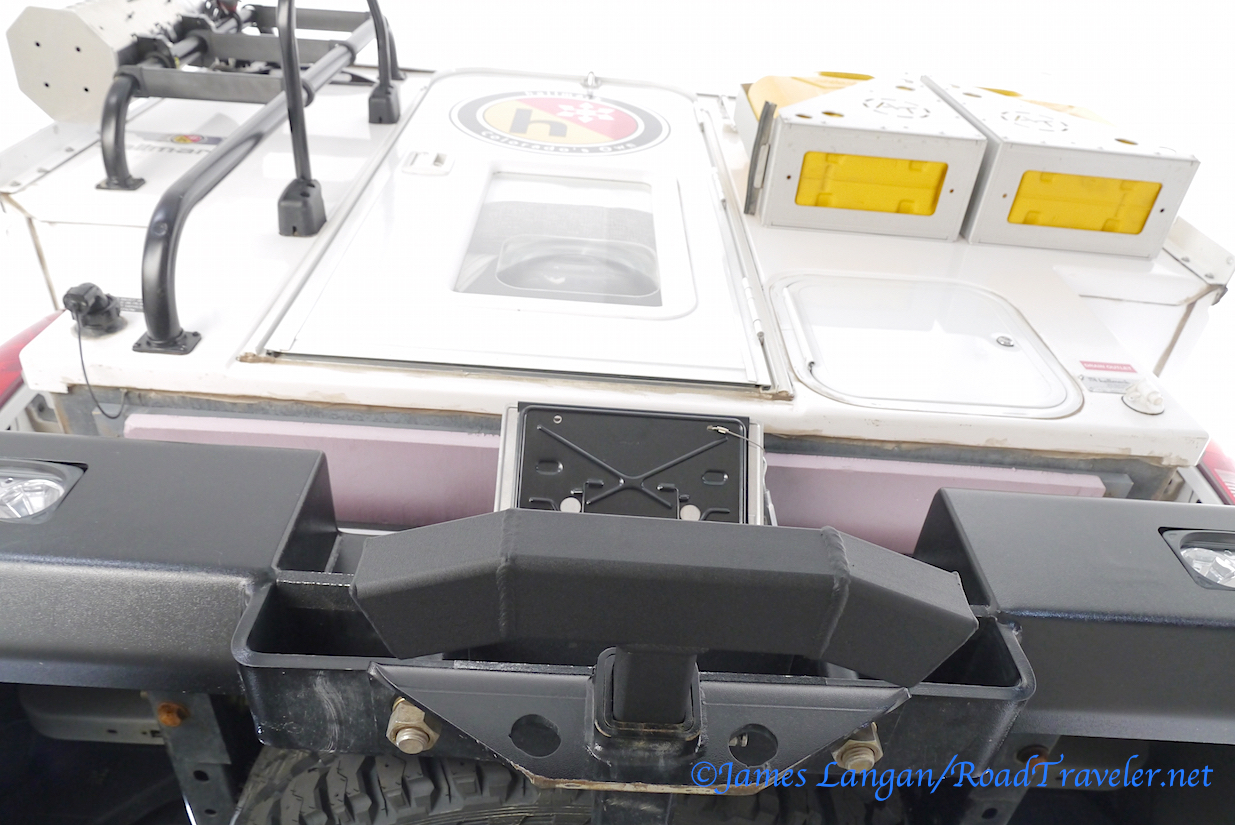
The White Knuckle Off Road Hitch Step is not merely a step. It is constructed from 3/16″-thick, 2″ by 3″ rectangular tubing, and is “4×4 trail ready”, according to White Knuckle. Surely this is not merely a claim, as many aftermarket bumpers are made from 3/16″ steel plate, so this should be equally stout. Yes, adding a protrusion off the rear reduces the truck’s departure angle. However, convenient camper access is required much more frequently that maximum off-highway clearance.

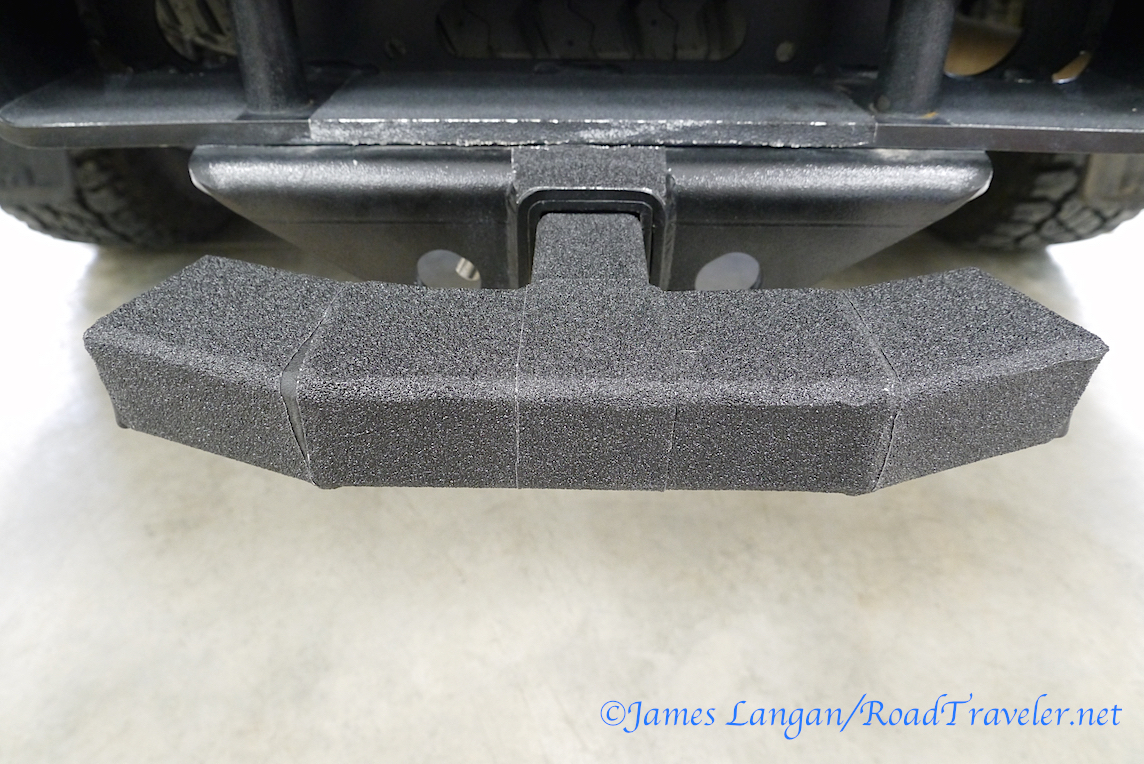
I had to remove my Factor 55 HitchLink recovery point (it remains with the truck) to install the step. For some pulls a Factor 55 Shorty Strap or a soft shackle around the step should work. Powder coated black and delivered with a new receiver pin, the welds are beautiful. After test fitting and a few trips in and out of the camper, I added Jessup conformable grip tape (skateboard tape) to increase friction.

Looks great installed too
Jessup conformable grip tape is relatively easy to add to irregular surfaces

I carefully considered the positives and negatives of adding White Knuckle Off Road’s Hitch Step, but think I’m going to be happy with the addition. This weekend I spent hours loading the camper for an upcoming Canadian trip, and used the Hitch Step many times. Works for me.

Need a lift? Looks like a long way up from down here.

Copyright James Langan/RoadTraveler. All Rights Reserved.

Resource: White Knuckle Off Road Products

Power Tank Worthington 6-pound propane bracket review

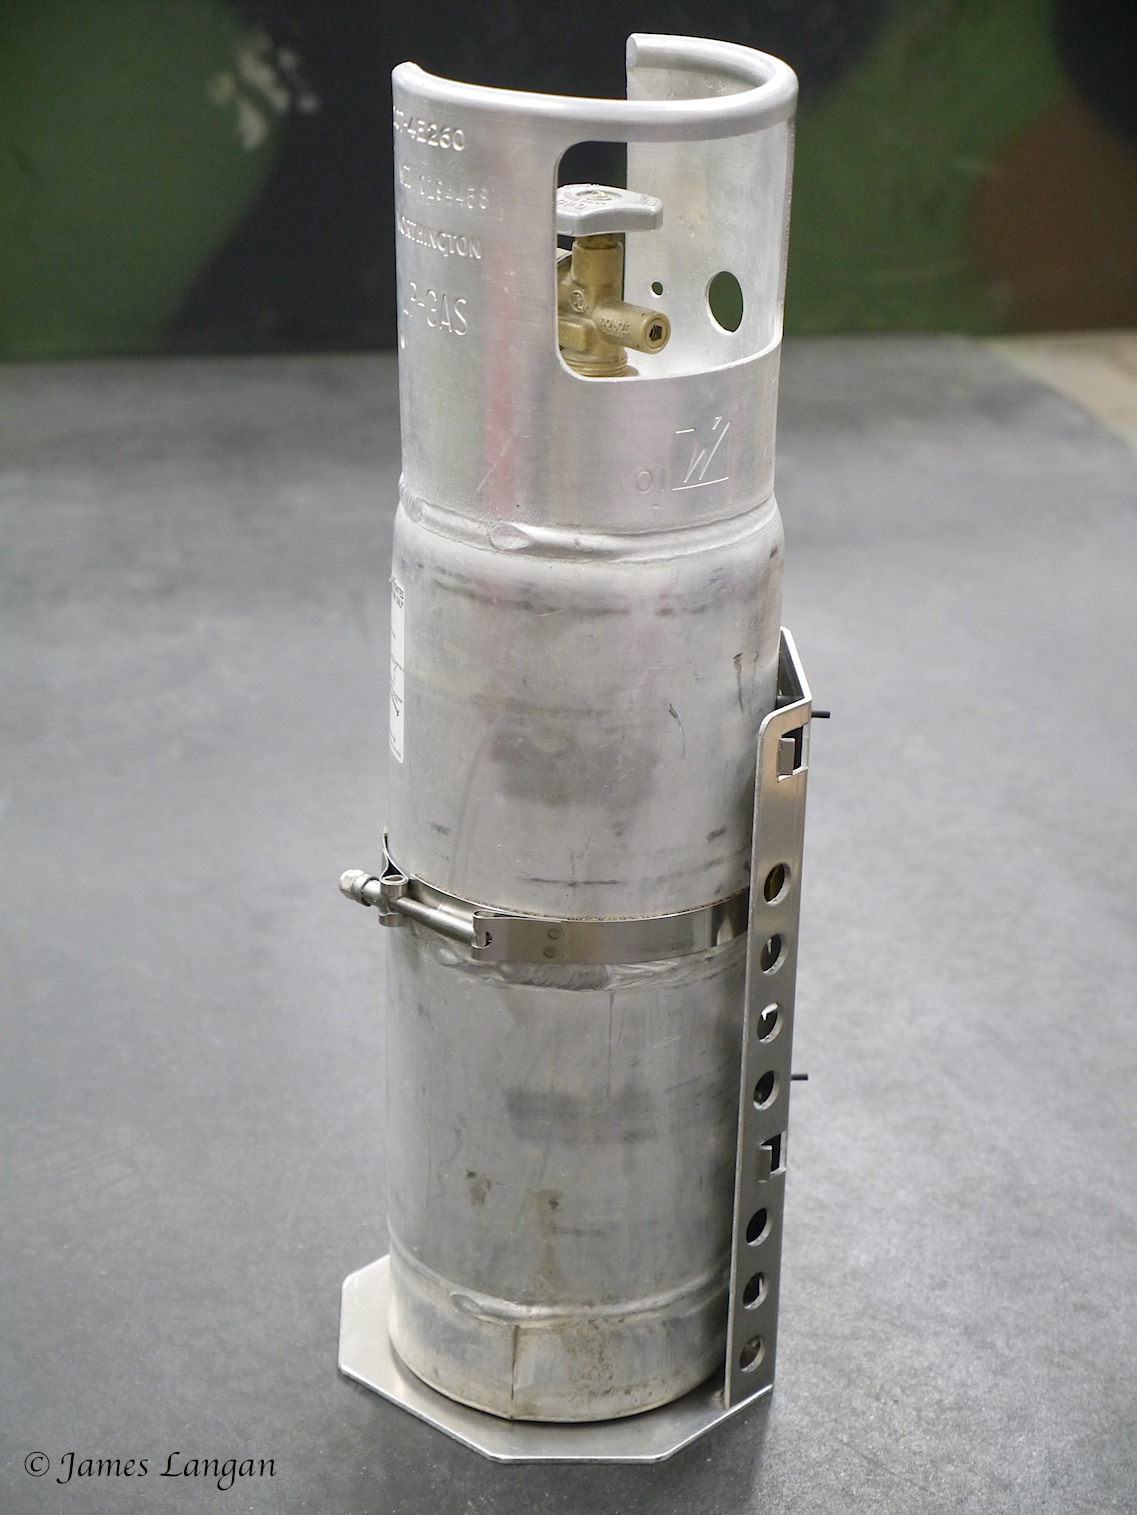
Bottle test fit before the roll bar clamps arrived.

Power Tank Stainless Steel Propane Bottle Mount

Having extra propane for our Hallmark Milner camper on long remote trips, or winter camping adventures that consume more fuel, has been a long-term goal. The question was how to mount another LPG bottle safely and securely. I’ve owned the tall, narrow Worthington aluminum 6-pound propane tank (#299494) for 10 years, which has been part of various camping setups, and was an obvious choice for extra Milner LPG. Six pounds is a small reserve, but some beats none.

Several months ago I visualized how a fire extinguisher mount could provide a solution, and did substantial preliminary research that convinced me a good match was available. Fitting the Worthington to an extinguisher bracket would be the first hurdle, and attaching it to my camper the second, and potentially more troublesome. Hose clamps to the roof ladder were planned if nothing better presented itself. I postponed buying the parts and making stuff work, but with a big, cold trip North in my immediate future, last month it became time to either create or buy something.

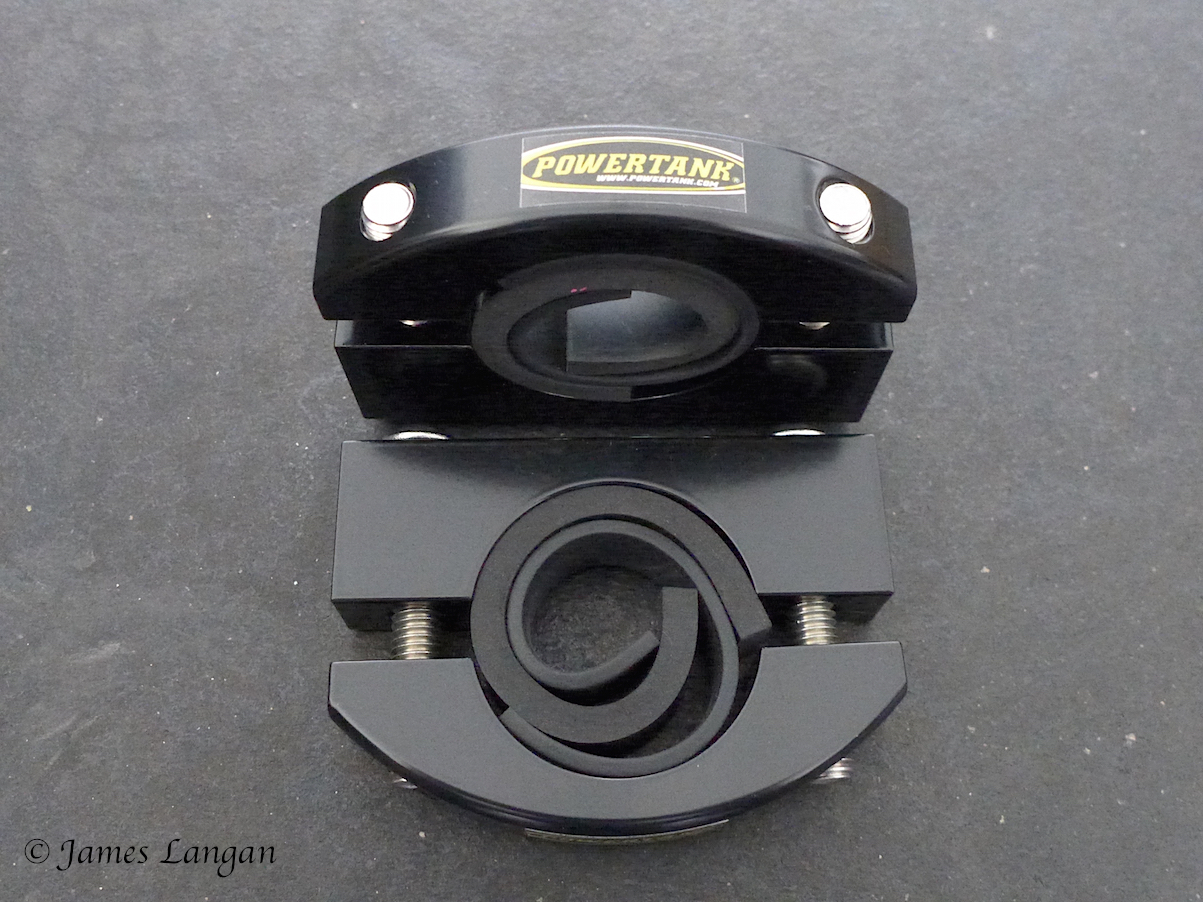
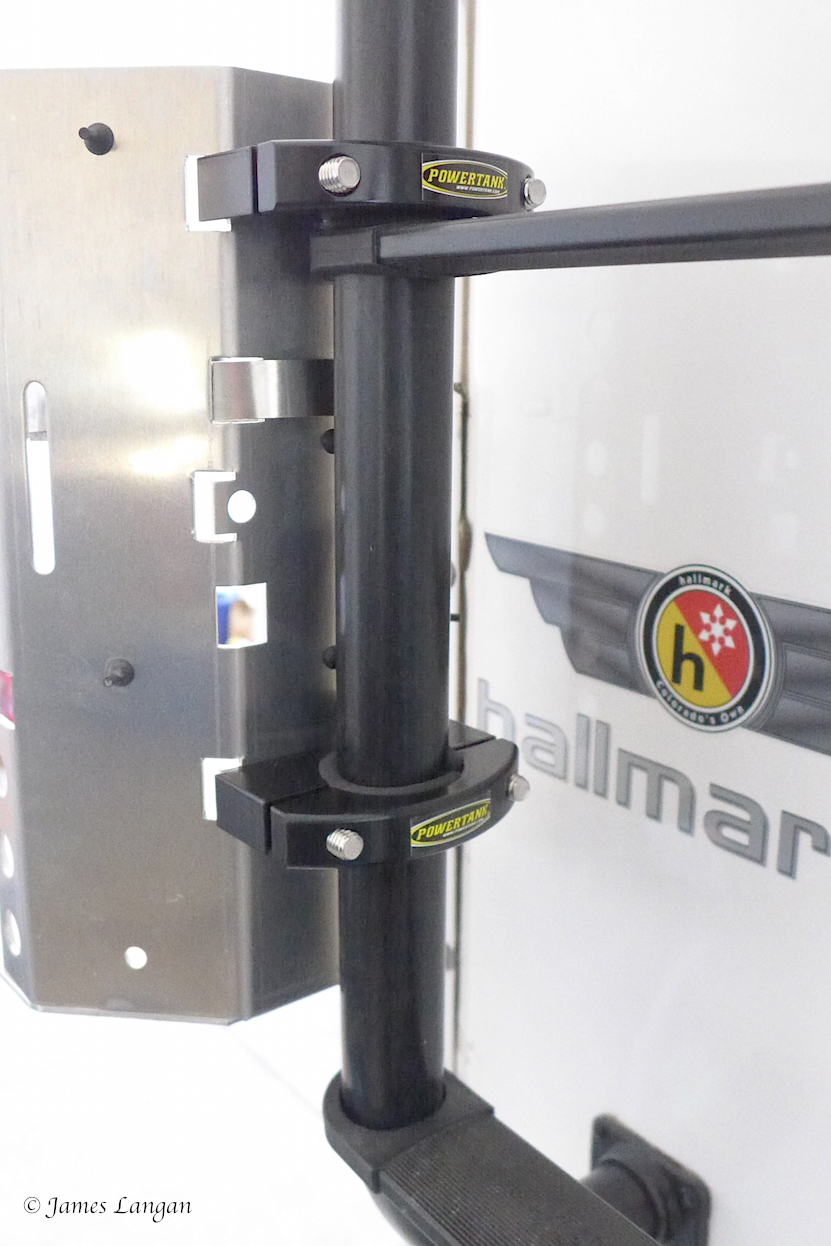
Power Tank’s small roll bar clamps will fit 1.5″ to 2″ diameters, using spacers for anything smaller than 2″.

Lucky Find

Additional Internet searches steered me to Power Tank, a company I was familiar with and known best for their portable CO2 on-board air systems. They also offer mounting brackets for many of their tanks, and I found one I thought would work well for the (299494) Worthington cylinder. A telephone call to explain my intended use and place an order was rewarded with a welcome surprise; Power Tank had just added a bracket made specifically for this 6-pound propane bottle to their catalog. It got better. The same roll bar clamps used to mount CO2 tank holders worked with the new propane bracket.

Excellent

Installation

After waiting for the backordered clamps arrive, it was time to get the parts fitted. My initial mock-up indicated mounting the bracket to the Hallmark Milner camper’s rear ladder would work as I’d envisioned. Power Tank’s small clamps are designed to work on 1.5″ to 2″ diameter tubing. Rubber spacers are provided for 1.5″ or 1.75″ bars, and the Hallmark’s ladder rails are approximately 1.5″ diameter. Needing spacers was a positive; the rubber mounting provides grip and protects the ladder finish. The clamps were tightened until a bulge appeared both above and below (tight). The bracket looks and feels very secure.

Using the larger rubber spacers, the clamps were tightened until a protective bugle appeared above and below the clamp lips.

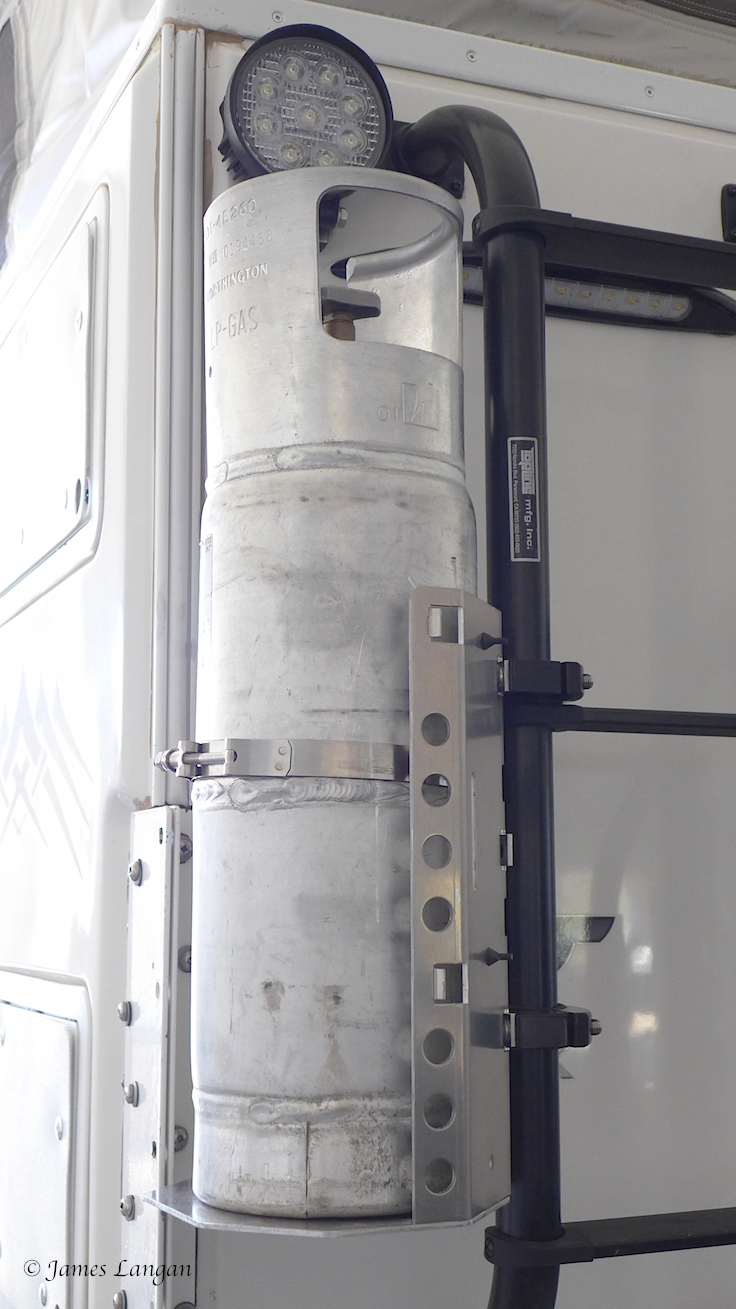
With the bracket mounted the LPG tank was fitted. The padded band is just the right size when tightened, without excessive unused bolt thread. To slide my bottle past the middle welded seam, the nut must be removed and reattached after the slightly larger section of the tank has passed the clamp. The band above the seam makes it very unlikely the bottle will slip.

This Power Tank bracket and how it was mounted appear specifically made for this camper application. The Worthington tank is almost perfectly inline with the port side of the camper; just one inch of the base extends beyond the side of the camper.

Looks like this Power Tank bracket was made specifically for this application, it fits the space perfectly.

BOLT Locks

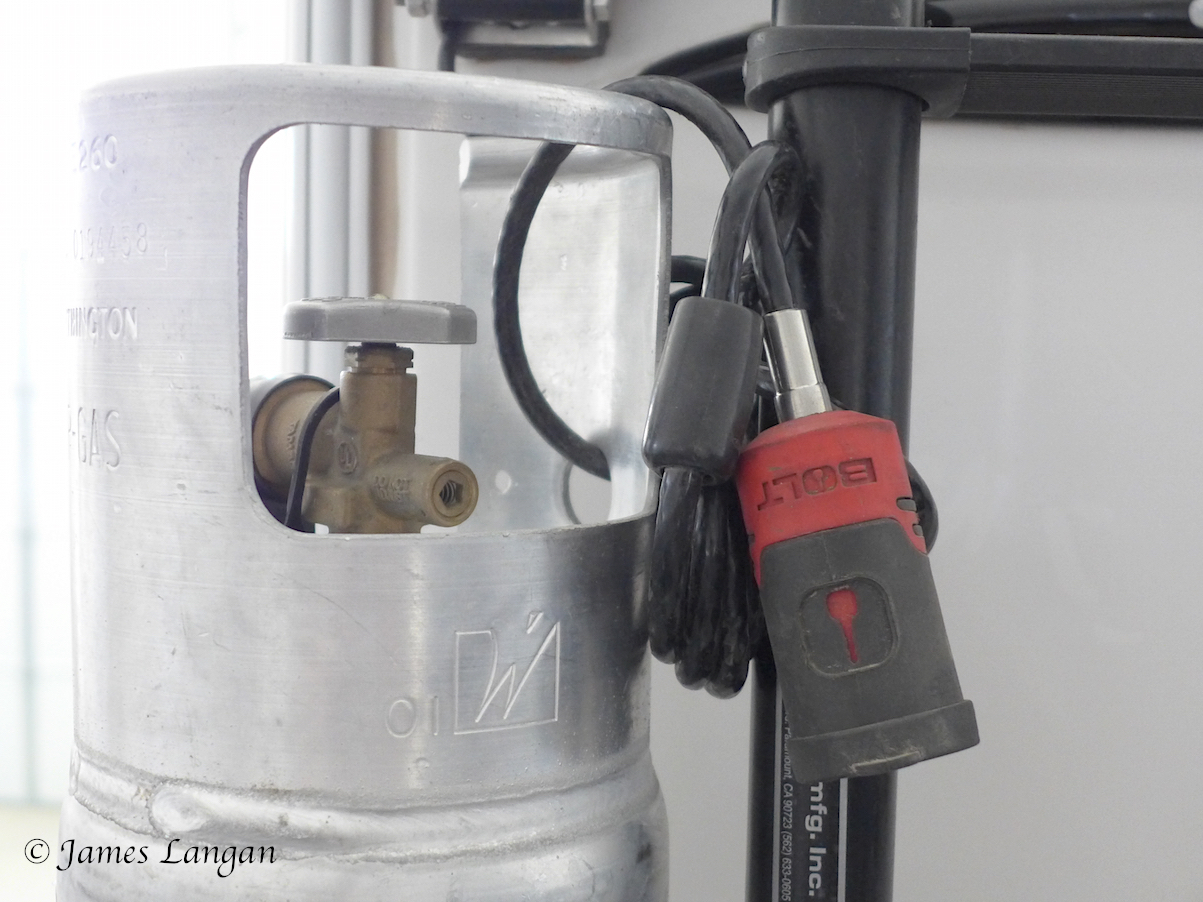
Theft happens. I’m a fan of prevention and helping keep people honest, which means locking my stuff when possible and practical. Over the past year I’ve become a huge fan of BOLT Locks one-key technology, using their locks whenever possible. One of their cable locks was used to secure the Worthington bottle to the top of the ladder. For more information about these fantastic locks read my article located here: RoadTraveler BOLT Locks review

BOLT Locks have earned my admiration over the past year, and I’ve added several to this ’14 Ram Cummins and Hallmark Milner camper. LOVE THEM!

Resource links:

BOLT Locks

Power Tank

Copyright James Langan/RoadTraveler. All Rights Reserved.

Canadian Arctic trip countdown

2014 Ram/Cummins, cold testing for a Canadian Arctic trip

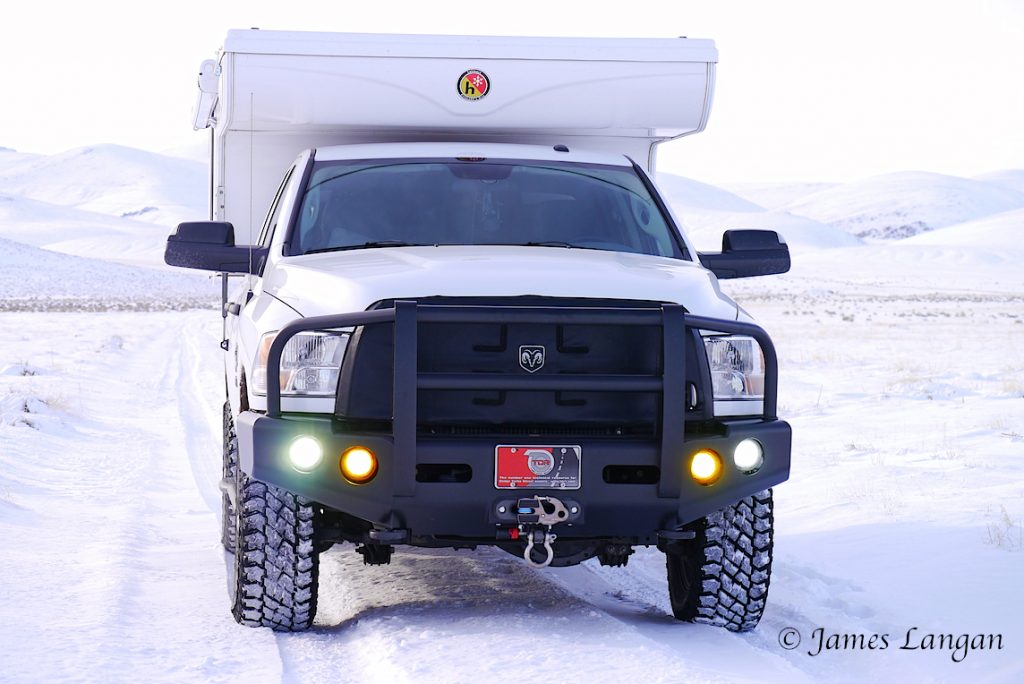
Canadian Arctic adventure countdown…we are less than four weeks out! Does it look cold? It was, but it’s nicer when the sun is out and the wind isn’t blowing. This was during a recent cold camp and drive test in Northern Nevada. The VisionX 4.5″ Light Cannons, Factor55 UltraHook, Fairlead 1.5, and a HitchLink 2.0 secured by a BOLT receiver lock, all look good mounted on the aluminum Buckstop bumper, which protects a Talon 12.5k Superwinch. Hard to see under the truck is an AEV front differential cover that completes the beam front axle. Surely the lights will see regular use on our big trip to the North. Hopefully the other stuff is not needed often.

Copyright James Langan/RoadTraveler. All Rights Reserved.

Resources: 

AEV: AEV

BOLT: BOLT Locks

Buckstop Truckware: Buckstop

Factor55: Factor55

Hallmark Campers: HallmarkRV

Superwinch: Superwinch

VisionX: VisionX 


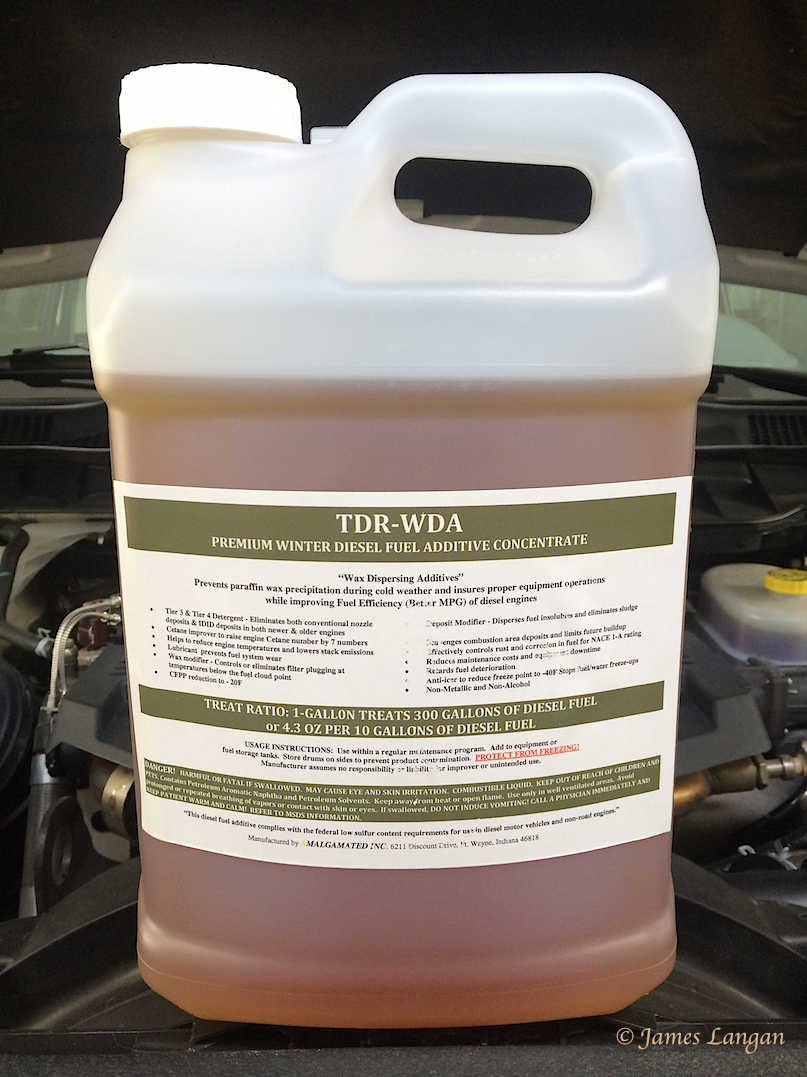
Amalgamated TDR-WDA diesel fuel additive

Amalgamated’s 2.5 gallon jug of TDR-WDA additive. Well worth the $97.

Got Diesel? Got cold temps? I’ve been using Amalgamated’s TDR-WDA additive for several months, and just bought another 2.5 gallon jug before heading to the Canadian Arctic in a few weeks. Prevention vs. repair and downtime is the goal.

Resource: amalgamatedinc.com, 260-489-2549 

Copyright James Langan/RoadTraveler. All Rights Reserved.

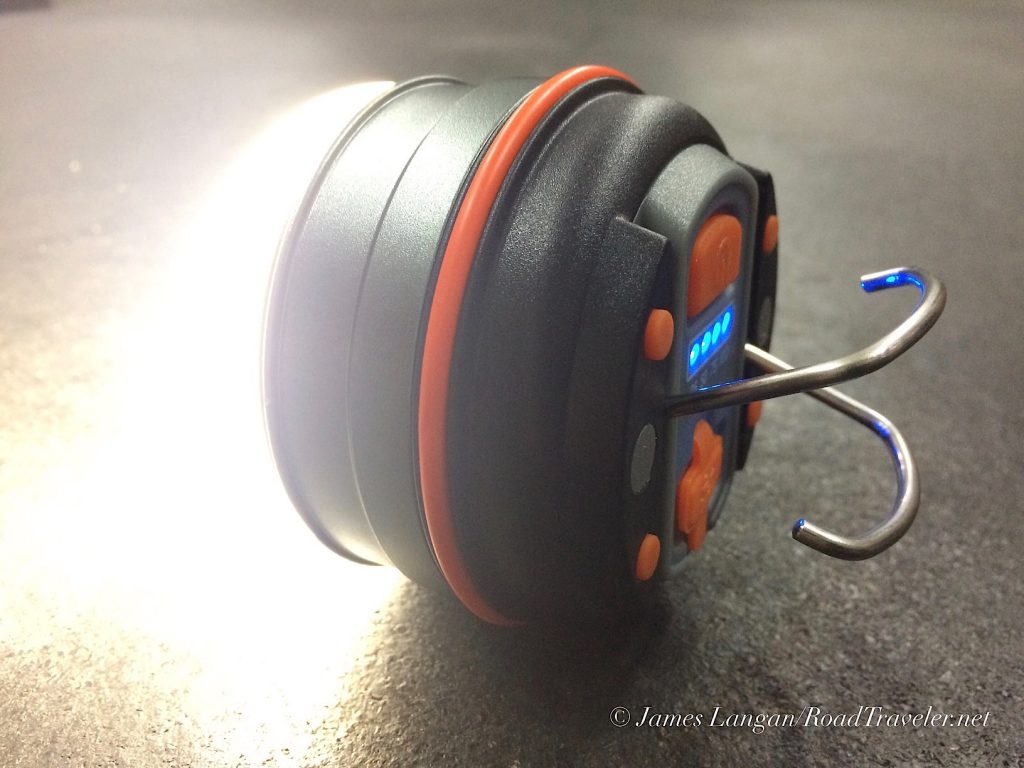
WAGAN Tech BRITE-NITE Dome USB Lantern

WAGAN Tech’s BRITE-NITE rechargeable LED lantern. 220 lumens on high.

This is WAGAN Tech’s BRITE-NITE LED Dome Lantern, the rechargeable USB version, which has high, low, and flashing modes. Just during the initial fondling and photos I was impressed with this bright, little light. It exudes quality, and can be employed in several ways using the powerful magnets (portable, wireless rock light?), or the built-in swiveling hooks. My intended initial primary use is as an interior cab light, to augment the one, only fair, centered OE dome light in my 2014 Ram Tradesman.

After more use, a detailed review is planned. My upcoming monthlong adventure to the Canadian Arctic should help it get a proper break-in.

WAGAN is new accessory company to me, discovered recently when I bought their SlimLine 1500 inverter to power an electric heater in my camper while underway. They make lots of cool stuff!

Resource: WAGAN.com, 800-231-5806

Copyright James Langan/RoadTraveler. All Rights Reserved.