WAGAN TECH DC TO DC BATTERY CHARGER


40A DC TO DC BATTERY CHARGER

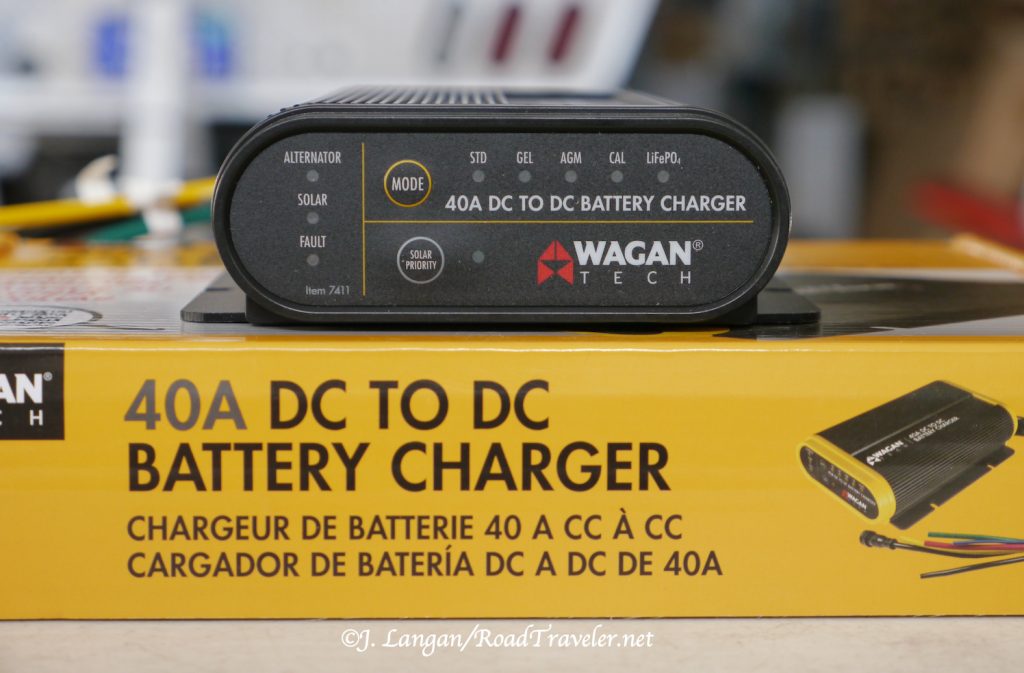
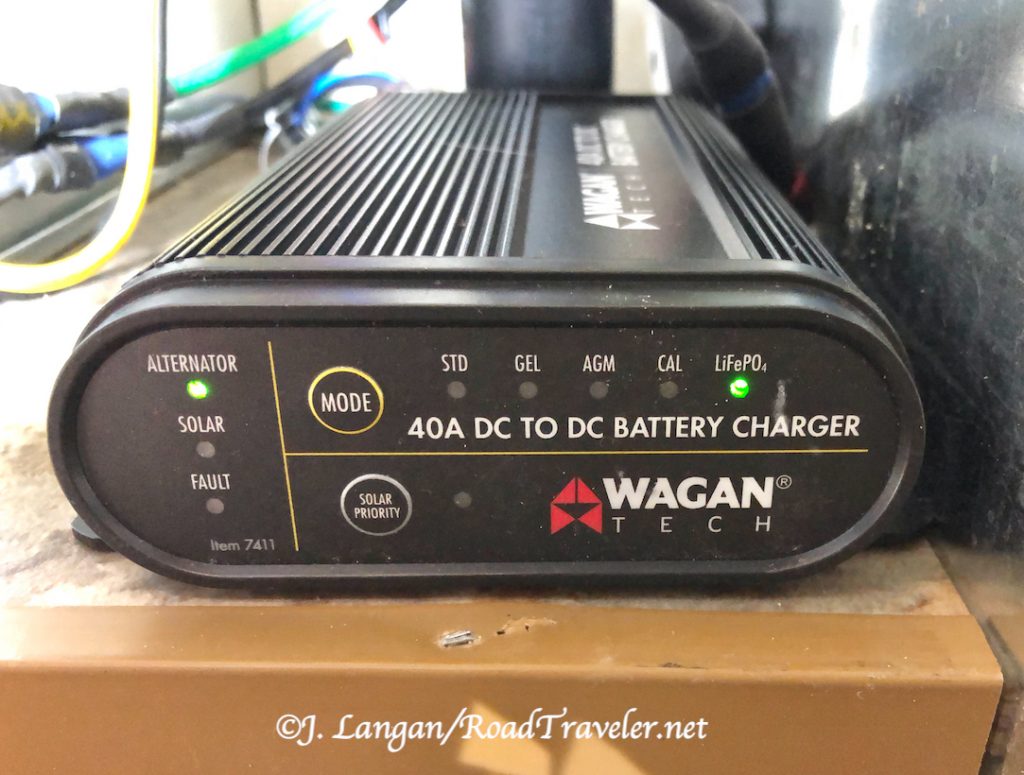
Wagan Tech’s 40 Amp DC to DC Charger 

It takes some type of fuel or energy to power things, this includes humans as without food (and other necessities) our systems will shut down. In the case of our beloved Cummins-powered trucks, that energy comes from burning #2 diesel fuel. The primary output of the internal combustion is propulsion of the drivetrain; however, supporting systems give and take from the consumption, including the cooling and electrical charging systems. 

Some readers know that the simple diesels from decades past would essentially run forever once started as long as the fuel flowed. They could be hard to cold-start, but they were also difficult to stop. This is because all diesels are ignited using compression ignition (CI), not a spark-ignition (SI) system like a traditional gasoline motor. Diesels are less complex without spark plugs, a coil, distributor cap and rotor, or wires, and while still fundamentally true there are modern complexities, chiefly the electronic fuel-injection. 

Mandatory Electricity 

Our newer, specialized, computer-controlled diesels need their modules to remain awake for everything to work properly (just like gas-powered trucks). Additionally, late-model vehicles are chock-full of countless electronic gizmos, from computer screens, cameras, seat and steering-wheel heaters, and the list goes on. The constant generation of electrical current from an alternator is no longer optional to keep the oil burning, but absolutely essential, even for daylight driving, because battery storage capacity is finite and amps consumed must be replaced.  

High-output alternators easily handle the load of the Cummins cold-start grid heater, or the glow plugs in other automotive diesels, plus the increasingly popular factory-installed inverters that convert the DC current to 120-volt AC to power tools or other plug-in devices. But what about additional intermittent or constant 12-volt DC electrical loads? 

Remote National Forest camping in Colorado. One only has what they bring with them.

RV Amps  

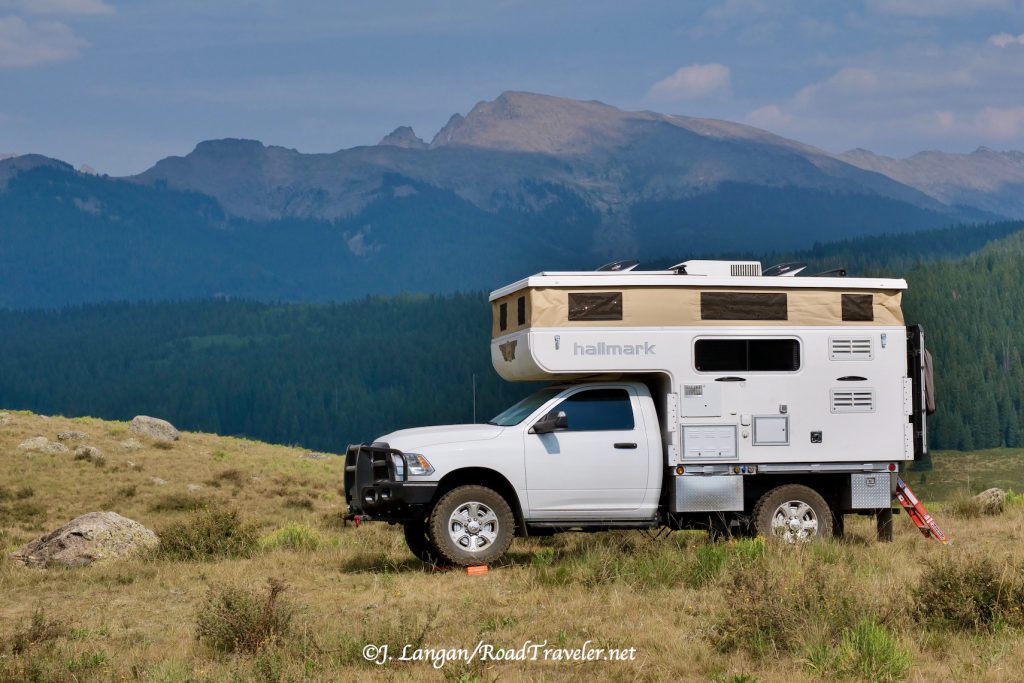
The TDR readership has always included a large percentage of RVers, and because we love our pickups so much, that means mostly travel trailers, big fifth-wheels, or truck campers instead of motorhomes. Solar panels atop an RV to charge coach batteries have been common for several years, as are backup generators to energize power-hungry AC appliances like microwaves and air-conditioners when shore power isn’t available. The solar panels require sunshine, and internal-combustion generators require fuel, so additional free amperage sources are welcomed. 

When an RV is connected to a truck via the 7-way trailer-towing outlet, typically a small amount of juice is delivered to the RV to help charge the coach batteries, often somewhere around 10-amps. The limitation is not alternator capability, but the size of the factory wiring. This small amount of amperage can help keep charged batteries topped if there are minimal loads; however running high-draw devices can lead to deficits. 

Modern Electric-Only Refrigerators

Like modern trucks full of gadgetry, newer RVs can have unprecedented amperage draws as well. The easiest example comes from the overlanding culture where electric refrigerators pioneered the replacement of traditional RV refrigerators, which principally ran on propane or 120 volts AC when plugged-in. Some older RV refers were theoretically capable of running on 12 V-volts, but they were terribly inefficient and would drain batteries fast.

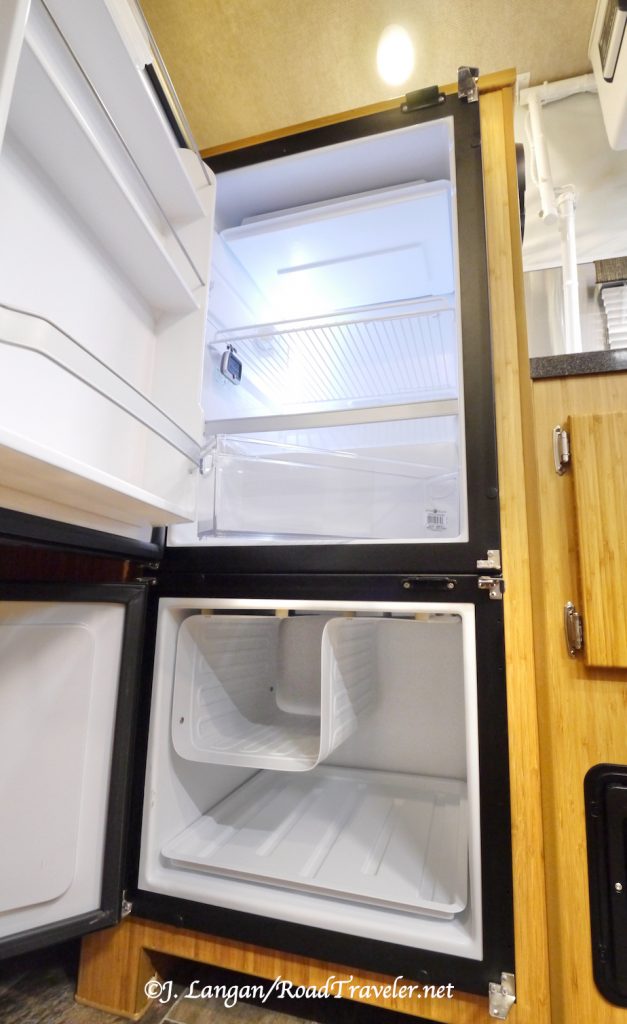
Instead of using the gas absorption method of cooling with propane, modern 12-volt refrigerators have a compressor, similar to the refrigerators in our homes. These can be built-in units, as in my Hallmark Camper, or a portable chest type refrigerator/freezer. These electric refrigerators are generally more efficient and effective, particularly in hot weather, and do not have to be leveled like a traditional RV refrigerator. 

The benefits are being appreciated by more folks all the time, and in the off-grid and overland camping crowd electric fridge/freezers are seen as more rugged and vastly superior. Even the traditional RV market has noticed. My cousin recently purchased a new fifth-wheel trailer to live in (temporarily) after selling his house, and the refrigerator is 12-volt and 120-volt only, it doesn’t run on propane. There is at least one drawback and that is amperage consumption. 

Large refrigerator and freezer for an 8.5-foot truck camper. Consumes up to 5-amps 12-volt DC when running.

Additional Electrical Loads

The large-for-a-truck-camper NovaKool refrigerator with a separate freezer door in my Hallmark Flatbed consumes up to 5-amps when running, and it runs a lot during the summer months. Five amps per hour adds up quickly, pulling a chunk of the total 200 amp-hour capacity we have from two, 100-amp Battle Born lithium batteries. 

My Hallmark is well sealed, but no RV is or can be impervious to dust, they need to breath like a house. With this in mind, and because I spend much time traveling off-pavement and nearly always camp in the dirt, I run one of my roof vent fans while driving to pressurize the living space. This works impressively well to minimize dust intrusion. There is one more big electrical draw inside my camper every 24 hours. 

Although I do not fit the physical stereotype (I’m tall and slim), I use a CPAP machine to help me breathe and sleep every night. This is another substantial electrical draw, a minimum of 4-amps, even with a dedicated 12-volt cord to avoiding the inefficiencies of an inverter. Multi-day road trips with lots of driving still result in a battery charging deficit because the factory RV 7-way provides minimal amperage. The 340-Watts of solar panels help, but they are insufficient to keep the camper batteries charged due to my consumption. A small 700-Watt 2-stroke generator travels in one of the under-bed toolboxes as an emergency back up. I prefer not to use it, and it produces a mere seven amps. So how can one easily generate more electricity? 

Dead camper batteries should be old news after installing this DC charger from Wagan Tech.

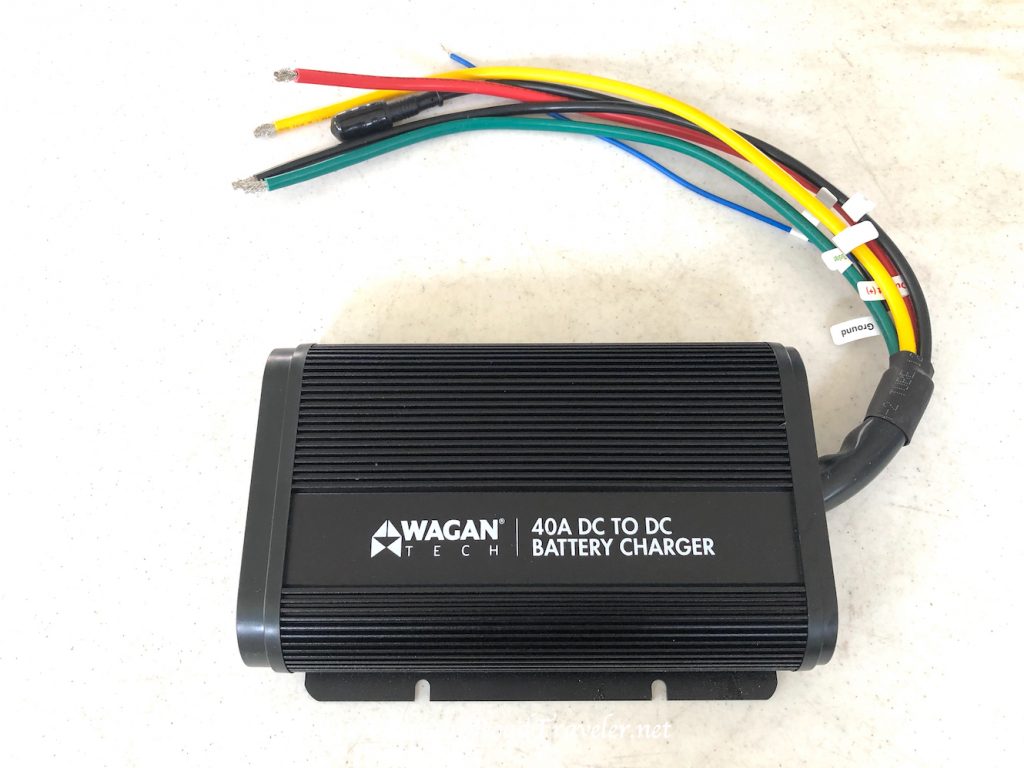
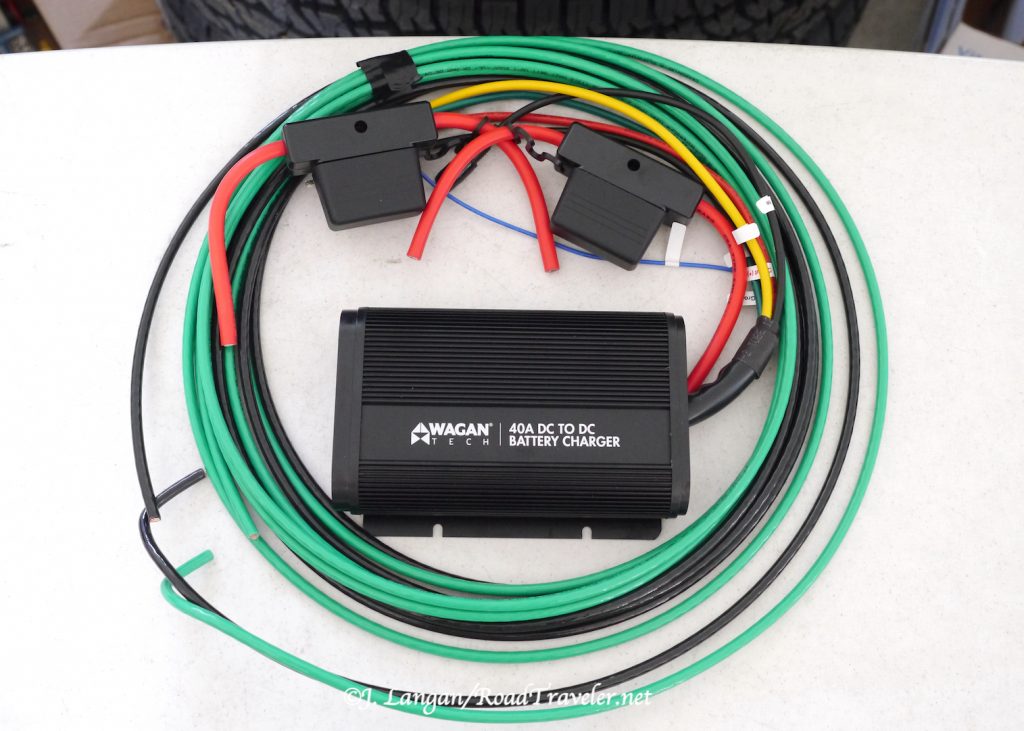
Wagan Tech 40 Amp DC To DC Battery Charger

DC to DC battery chargers have been around a few years. They are popular in places like Australia, where the off-pavement backcountry travel market has historically been more robust and innovative. These devices are exactly what they sound like, taking DC amperage from the battery/alternator charging system under the hood and feeding it directly to auxiliary (RV) batteries through large wires. Sounds simple, and it is. But, they need to be hard-wired. Wagan Tech introduced their new DC to DC Battery Chargers in 2022, both a 25-amp model for $300, the $400 40-amp model that I installed. 

New Hole Required

If the auxiliary battery to be charged is on the same chassis, like inside the same engine bay, the installation is easier. If secondary batteries are in a separate RV, the wiring needs to go from the host chassis into the recipient. If the RV is a trailer that is attached and disconnected regularly, then something like an Anderson plug provides a robust connector (and something I intend to add in the future). 

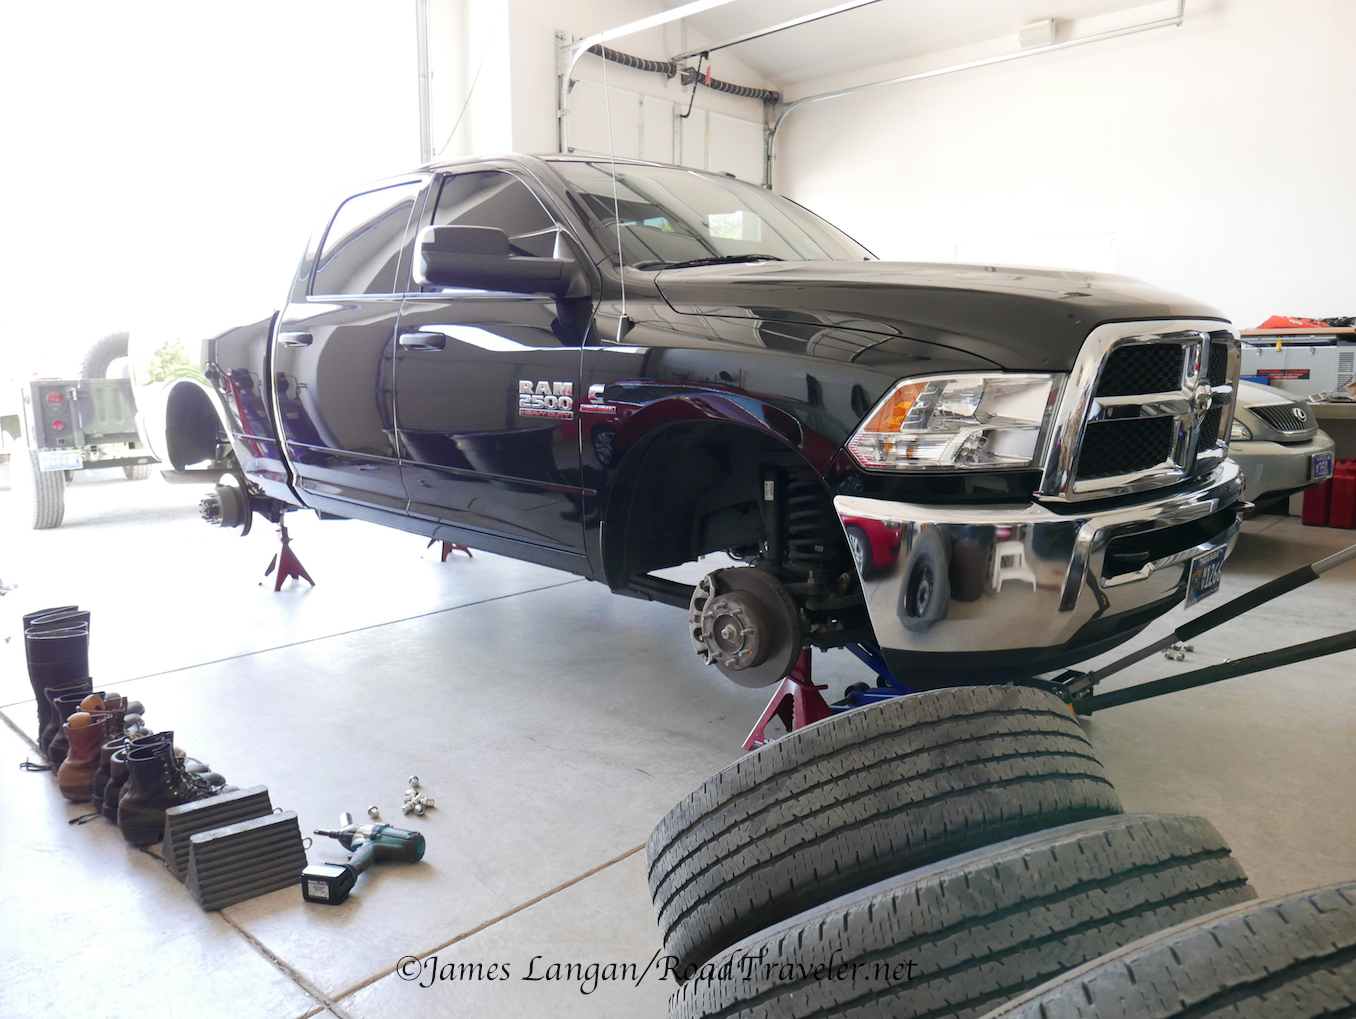
With my Hallmark flatbed outfit, I directly connected new wires from the Cummins engine to the camper batteries, which required a new hole in my Hallmark. The process was not trouble free. 

Parts and Supplies Matter 

In an effort to avoid drilling a new hole, I attempted to use smaller but adequate 8-gauge gauge wires, running them alongside the existing Hallmark 7-way RV pigtail. The new positive and negative wires added too much girth to get the nut onto the knockout plate. This defeat came after hours spent running the wires from the engine bay, along the chassis, and then stuffing them next to the factory Hallamrk wiring pigtail and into the coach. 

Ran these 8-gauge wires from the engine compartment, along the camper’s 7-way plug, through the existing wiring hole, but had to start over.
There wasn’t room for additional wires, I stuffed them through the knockout plate nut anyway, but couldn’t wiggle the nut up to male end to secure the plate. See the gouged insulation? That’s how tight.

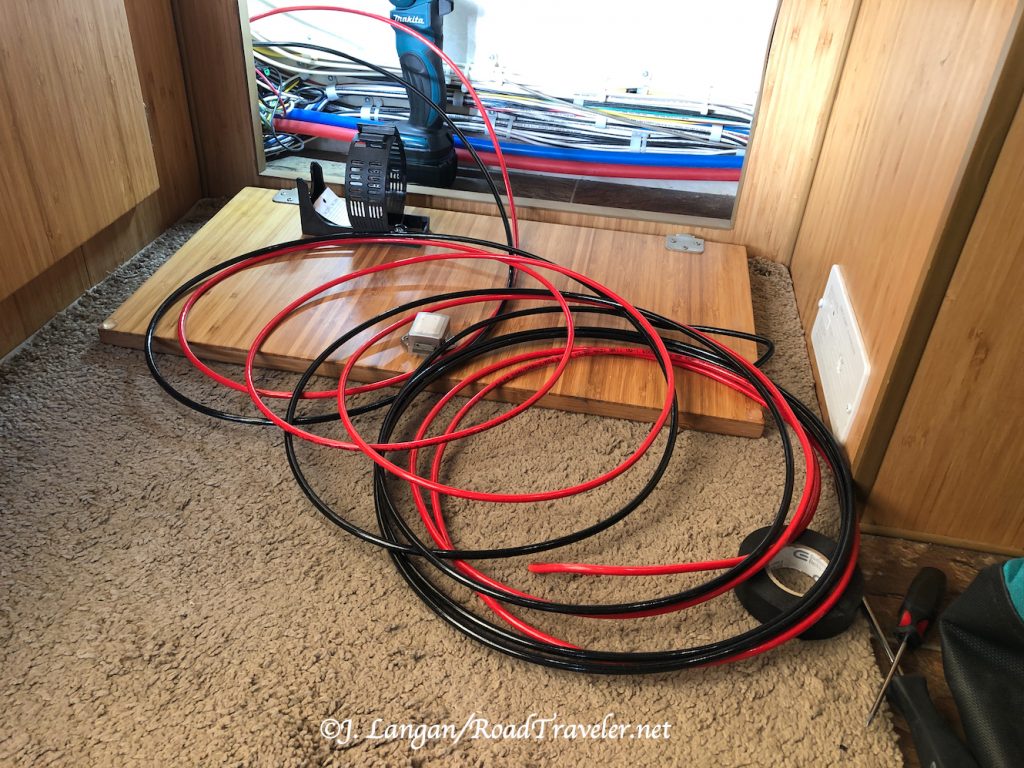
When it was obvious that drilling a new hole was required I decided to use larger 6-gauge wire, good for up to 32-feet. The finished total length was less than 20-feet so the wire will easily handle the amperage. Due to time constraints the wire was purchased from a nearby Home Depot, the trade-off being that it is not as flexible or easy to work with as ever thinker, larger welding cable. 

Home Depot didn’t have red 6-gauge so I had to take green. Shown with two 60A Maxi fuse holders.

Measure Multiple Times And Drill Once — A Nice Idea

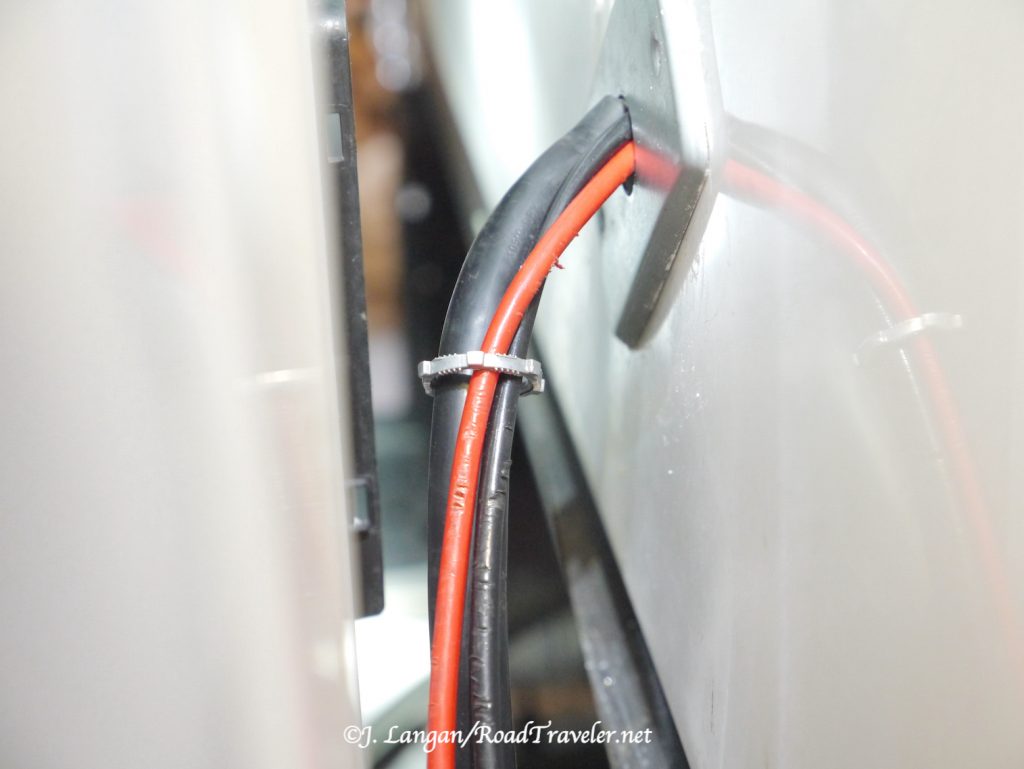
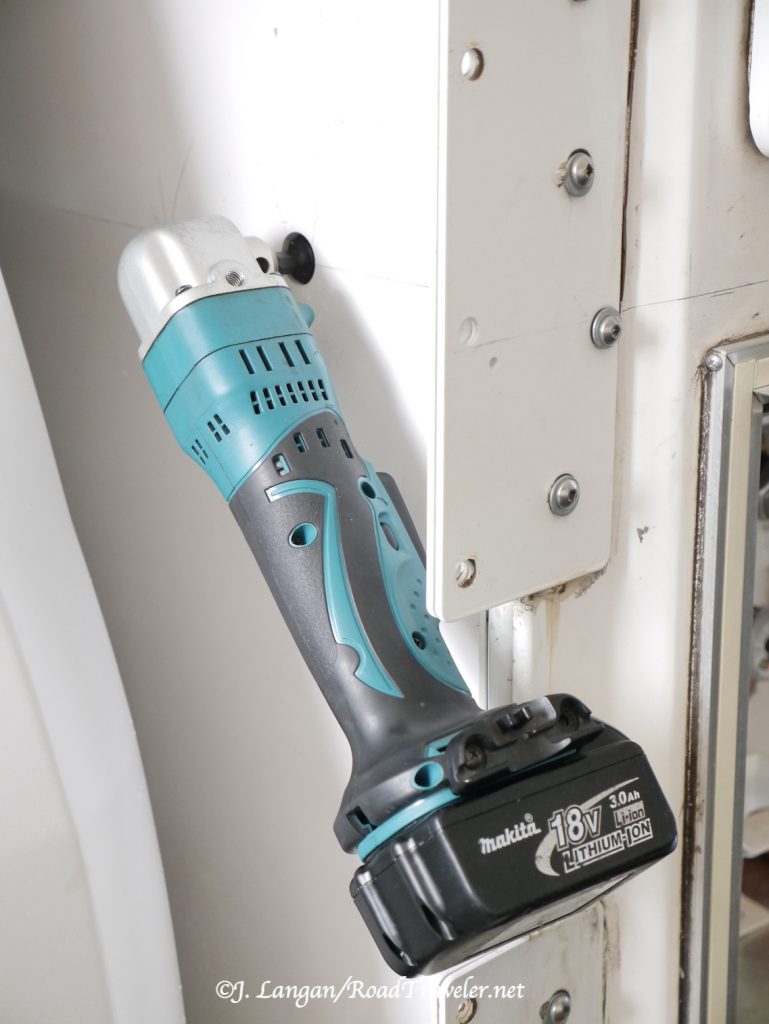
The new hole in the driver’s side front wall needed to go below the water heater and above the propane locker, and it needed to be approximately 1-inch diameter. After measuring and making countless trips from the front wall into the camper, I was confident about the placement before drilling the pilot hole. Using my cordless right angle drill, I nailed it, but I assumed the 7/8″ hole saw I had was big enough, and I made a nice, clean hole. However, it was too small for the knockout plate bolt to slide from inside the camper, clamped on the 6-gauge wires, through the wall to the exterior to reach the knockout plate nut.  

New 7/8” hole drilled into the front of my Hallmark Camper. Measuring and drilling went well up to this point.

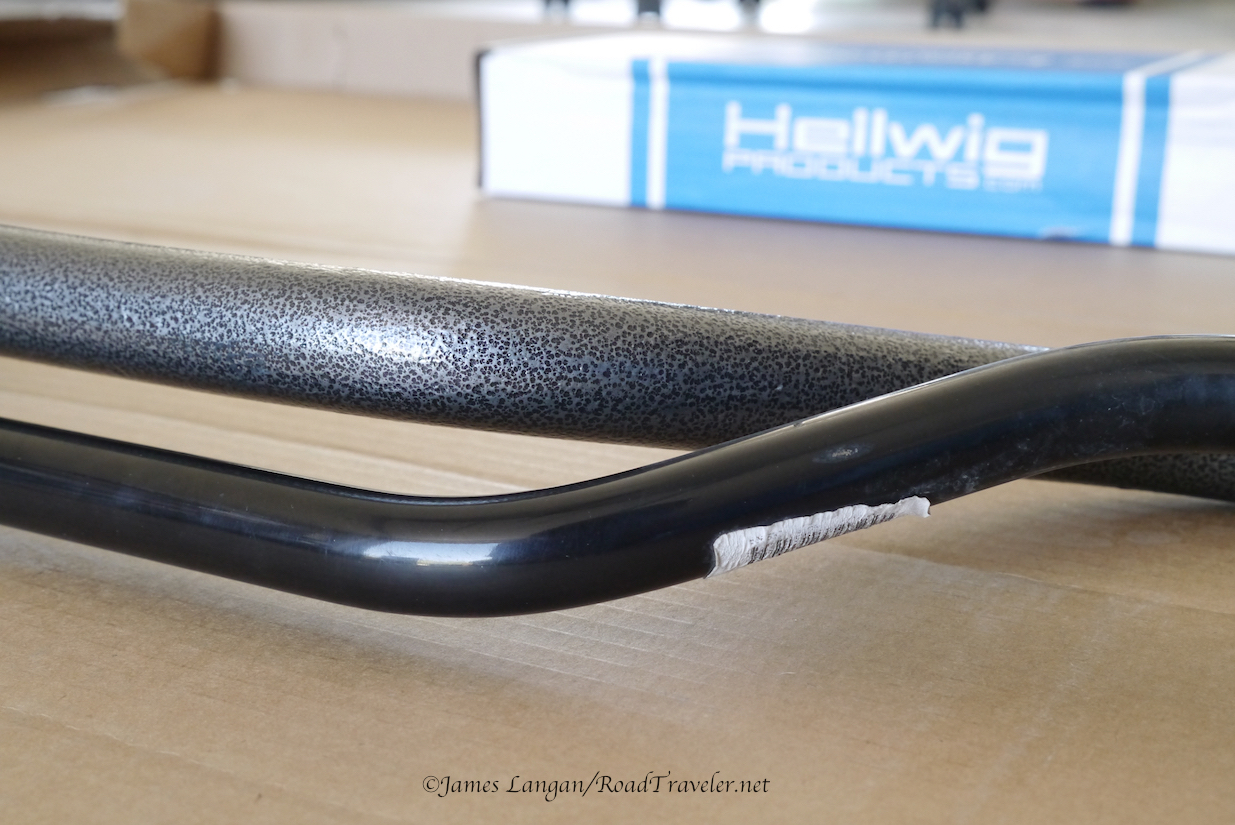
Back to Home Depot to buy a larger hole saw, something near 1 1/4″. As many do-it-yourself folks know, it is relatively easy to new to drill a clean new hole, but difficult (almost impossible) to cleanly make a hole slightly larger. A few times I slowly and carefully tried to get the larger hole saw started, but, of course, the saw just slid on the fiberglass. When trying gently does not work, what is the typical response? Add force. 

The Neanderthal in me came out, and I leaned on the drill to make the saw bite into the fiberglass where I wanted; this was a bad idea. The saw walked on the slippery fiberglass surface, but with increasing force it eventually dug into the exoskeleton wall, making the scar you see in the photo below. I didn’t swear much, but I was slightly displeased with myself! 

Without the benefit of a centering pilot hole, I attempted to enlarge a perfectly drilled hole and made this mess instead.

Disgusted, angry, and frustrated, there was no going back, and I still needed to enlarge the hole. My solution was what I should have done after discovering the hole was just a bit too small; I ran a half-inch bit around the circumference of the hole until it was big enough. 

Running a 1/2” bit around the circumference of the hole to make it larger should have been my first solution, not the second.

Thirty years ago this would have bothered me for weeks. I like to do clean, high-quality work. It’s covered by a plate and will never be an issue to anyone but me, and I’ve put it behind me. With the challenging part completed, it was time to finish the installation and get the Wagan Tech DC to DC Charger working. 

Pulling And Connecting 

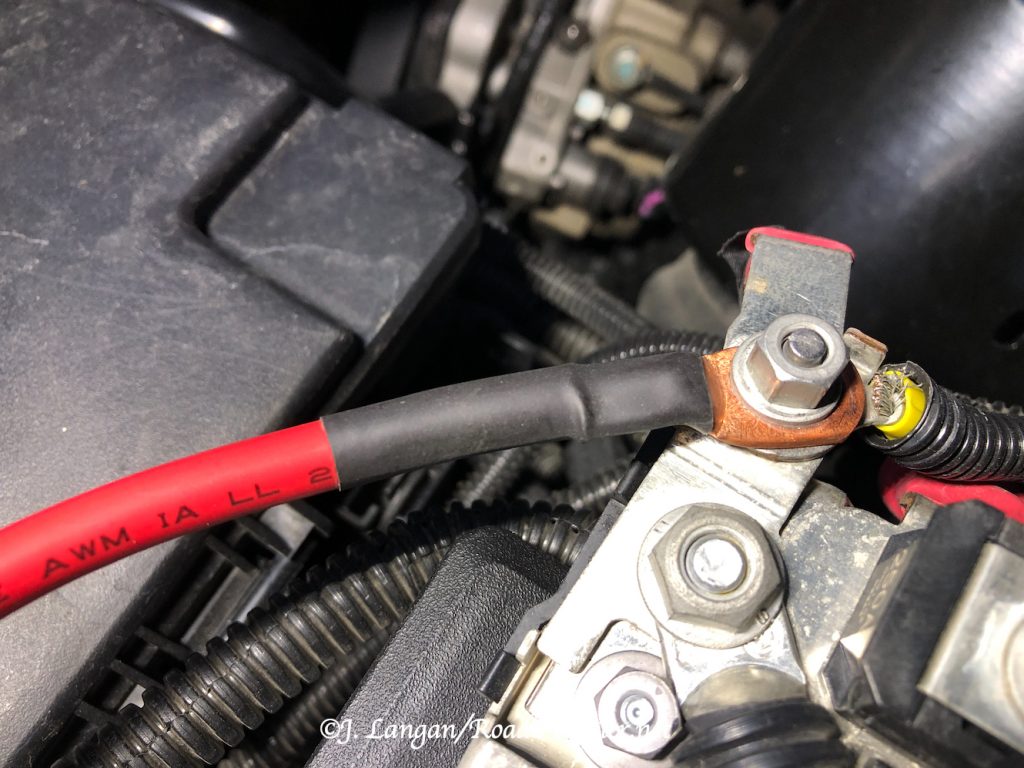
The rest of the installation was straightforward and easy, and there were no more hiccups. I fed  the 6-gauge wire through two rubber firewall boots to provide a weather barrier, one from the camper front and one from the inside, then along the frame and into the engine compartment to the driver’s side battery. 

Had two of these stepped, rubber firewall boots leftover from a prior product (purchased after a prior drilling mistake). Stuffed the new hole with one from inside, and another from the front behind the knockout plate. Should be very weather resistant.
This knockout plate was always on the parts list, but also conceals my drilling snafu. Looks tidy and works too.

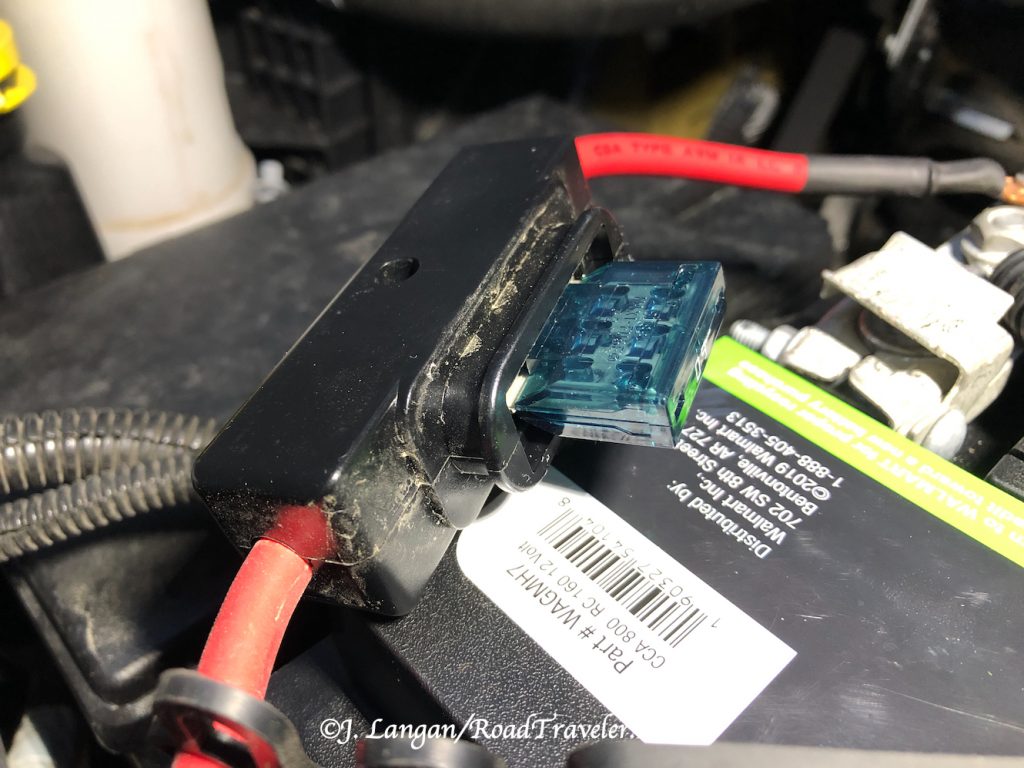
This Wagan 40-amp unit requires two 60-amp fuses, one as close to the engine bay battery as practical, and another on the Wagan charger output line near the auxiliary batteries. Bolt-down fuses are recommended because they have lower resistance than blade type, which can have higher resistance and create excessive heat. However, the blade-type Maxi fuses are what I found locally, and I’m confident they’ll be sufficient.  

Blade-style 60A fuse holders are what was available locally.

With the incoming hot and ground wires from the engine connected to the Wagan charger, another small hole was drilled in the Hallmark’s battery box to run a hot lead from the charger to my two 100-amp lithium RV batteries. 

New small hole drilled into the camper’s battery box, with the hot, output line from the Wagan 40A DC to DC Charger to a positive terminal.

With the fuses inserted I had the appropriate blinking lights on the front of the Wagan DC to DC Battery Charger; one light showing it was connected to the alternator, and after changing the battery type to LifePO4, that light was on as well. The unit is capable of working with standard, gel, AGM, and lithium batteries. 

Wagan Tech’s instructions are short, simple, and easy to follow, and folks capable of doing basic wiring will likely have no problems doing this themselves. Because of the largish 6-gauge wire and connectors I used a hydraulic crimping tool, and I covered the ends with heat shrink, routed the wires as cleanly as possible, and protected them with split-loom. 

60A fuse lead connected directly to the driver’s side positive post with copper ring. Heat shrink looks good and adds protection.

Mounting Options 

The Wagan charger is designed for a variety of installation environments, including chassis rail, engine bay, interior cabin, etc. The unit has been designed to work in vibrating, wet, dusty and muddy environments, and can withstand temperatures of up to 176°F, so it can be installed in the engine bay. However, to get better charging efficiency, mounting the charger away from high-temperature parts is preferred. 

I simply stuck it to the bottom galley shelf with mounting tape, between the propane locker and battery box. I may add screws later if this is the charger’s permanent home, but it’s not going anywhere on this flat surface. 

Flashing green lights indicate the Wagan Tech DC Charger is connected to the alternator and is feeding LiFePO4 batteries. Simply stuck to a shelf inside a galley cabinet with mounting tape.

Wagan Tech DC Charger Works  

Using more amperage than is being generated during long road trips should be a thing of the past. We’re unlikely to need a generator unless we want to run our air conditioner, in which case we would tote our larger Honda 2000. 

Pumping a massive 40 amps per hour into the Hallmark’s lithium batteries means it takes little driving to fill them; every time we make camp the batteries will probably be full. Even if the lithiums were completely drained we could replenish all 200 amps in five hours! 

Our initial adventures with Wagan DC to DC 40-amp Charger installed were extremely encouraging, the camper batteries were full whenever we stopped, and the voltage was high, as if we’d been connected to shore-power.

The Cummins is a large and expensive generator, but because we are already traveling, delivering essentially free electricity from our alternator to the camper batteries is a game-changer. Why did we wait so long to add something like Wagan’s 40A DC to DC Battery Charger? 

Drive diesel and tell ‘em you saw it in the TDR! (A version of this article was previously published in the Turbo Diesel Register magazine.) 

Tell ’em you saw it on RoadTraveler.net

Copyright J. Langan/RoadTraveler. All Rights Reserved

www.RoadTraveler.net 

Instagram: @RoadTraveler 

Twitter: @RoadTravelerNet

YouTube: RoadTravelerNet

Resource: 

Wagan Tech: wagan.com 


Hagerman Pass Road, Colorado

Heading down the east side of Hagerman Pass, near Leadville, Colorado, after crossing the continental divide.

I’m in my 2017 Ram/Cummins with Hallmark Nevada flatbed camper, following my buddy Brad, pulling his Kimberley Karavan trailer with his second generation Toyota Sequoia, and Tony in his 6.4L F-250 with a Four Wheel Campers Hawk on the back.

Tell ’em you saw it on RoadTraveler.net

Please consider becoming a patron.

James Langan

Copyright James Langan/RoadTraveler. All Rights Reserved


ARB Differential Breather Kit

ARB Differential Breather Kit.

It’s not news that oil and water don’t mix, but if it happens inside a driveline component and you are unaware, the results will eventually be catastrophic. The factory differential breathers on late-model Rams are raised slightly, to near the top of the tires, which is good enough for most folks. Hopefully that would be plenty for me too, as I’m not a fan of playing in deep water or soupy mud. However, it has happened before, including an unfortunate loss of forward progress that lasted hours. Being an ounce-of-prevention guy, I chose to be proactive regarding keeping the H2O out of my gearing lubricants.

For decades I have extended the breathers for driveline components using small, inexpensive air or fuel filters, but a few years ago ARB introduced a most tidy aftermarket solution that I’ve used since. Employing the same filter as their 12-volt air compressors, ARB makes a neat aluminum manifold into which their filter and extended vent lines attach. Vent tubing and fittings are also supplied, and the kit retails for $72.

Aluminum manifold block and air filter.

For the 2017 Ram/Cummins 2500 Pack Mule with Hallmark flatbed camper, I mounted the ARB manifold at the top left of the engine compartment, similar to my 2014 Ram, but I drilled a new hole this time. Using the OE rubber vent hose as my start, the rear axle breather line was extended using ARB’s plastic vent tubing, first inside the Hillsboro flatbed frame, then along the truck frame under the cab and up into the engine compartment. The front differential vent was extended the short distance from near the left front shock, and the transfer-case breather was raised from atop that gearbox into the engine compartment. A trained eye might notice the ARB Differential Breather Kit as aftermarket, but it’s very tidy and clean.

Low, factory vent hoses/caps can get clogged with goop, snow, or ice, causing housing pressure that can lead to leaks. Mounted in this spot, the filter just clears the closed hood.

Tell ’em you saw it on RoadTraveler.net

Become a RoadTraveler patron. Thanks!

James Langan

Copyright James Langan/RoadTraveler. All Rights Reserved

Resource:

ARB USA

20 Inch Wheels and Tires for Heavy Pickups

Are 20 inch wheels and tires better for handling heavy loads? Is the firmer ride on rough surfaces (both paved and not) worth the additional lateral stability? How about for all-around, dual-sport, and overland uses? I’ve never run 20 inch wheels before, preferring the proven off-highway formula of less wheel and more tire sidewall.

About a week ago I bought a used set of stock Dodge/Ram 20 inch wheels and tires, and have been driving on the worn factory tires to establish a 20 inch baseline on my heavy camper truck.

Tires and wheels at the end of this video are: Toyo C/T 35×12.50R17 on Ram forged aluminum (WFV) Power Wagon Wheels, Toyo R/T 285/75R18 on Ram Forged aluminum (WBJ) Big Horn wheels, Firestone 285/60R20 on Ram (WF3) black painted, aluminum, Black Appearance Group wheels.

Tell ‘em you saw it on RoadTraveler.net.

James Langan

Copyright James Langan/RoadTraveler. All Rights Reserved


Hellwig Big Wig Rear Sway Bar

Big Wig bar diameter is noticeably larger than the OE anti-roll bar.

Hellwig Big Wig Anti-Roll Bar

Both my Fourth Generation Ram/Cummins 2500s have been frequently or constantly loaded to their Gross Vehicle Weight Rating (GVWR), and the stock suspensions and chassis have impressed me with their ability to handle maximum loads, including the factory rear stabilizer bar’s ability to tame body-roll. However, when pushing the limits of ratings, sometimes a little help from the aftermarket can increase handling performance, safety, and improve our driving experience. My choice was a heavy-duty, adjustable, rear stabilizer bar from Hellwig Products; they call it the Big Wig (part #7306, $570). Hellwig makes another rear bar for late-model Rams; however, I wanted the stoutest one for my loads.

All parts and fasteners were included with the Big Wig bar.

Hellwig knows more than a little about suspension products, they’ve been doing it since 1946, remain a family-owned-and-operated company, and still manufacture their products in Visalia, California, with American-made steel. They make steel helper springs, anti-roll (sway) bars, and air springs. Back in the early 1980s I purchased my first sway-bar product from Hellwig, for a VW Bug, which also lowered the front of the car. (I’ve not lowered a vehicle since.)

Mounting the Big Wig was easy, similar to changing shocks on a Fourth Generation Ram. After assembling a few bits, and properly adjusting the end links, it’s simply a matter of removing the factory bar and mounting the Big Wig in its place. All the parts and fasteners needed are included, and the written instructions are clear. Hellwig gets extra points for above average photos that are bright, and separately securing both the heavy bar and small box of parts inside the large shipping box, avoiding common strewn bits, box failures, or parts damage.

Using the factory bar to measure and adjust the length of the much beefier Hellwig bar ends.
Bar end bushings were pressed-in with a bench vise using the lube provided.

The Big Wig bar is substantially larger than the factory piece, and its shape provides plenty of clearance for my Mag-Hytec rear differential cover. Hellwig recommends starting at the outer, rear-most bar-end mounting hole, which is the softest setting, and moving to the two more firm holes, if desired after adjusting to the vehicle’s new handling characteristics. Because of my maximum load, I went straight to the firmest position.

Installation completed and ready for a road test.
Using the firmest, most forward hole. Zero clearance concerns near the tailpipe on the passenger side.

Does It Work?

From the beginning of my first test, there was a noticeable reduction in body roll, and overall improved stability and control. It does not turn a heavy truck into a sports car, but it was a great improvement. I made detailed notes during my initial drives which included the following Big Wig attributes:

-Limits how much roll occurs; the performance is somewhat similar to a better shock absorber. With the factory bar, after the initial body roll, there would be added oscillation and wiggle before the chassis returned to neutral after the disturbing force ended. The Big Wig stops the roll sooner and then holds the chassis more firmly until centering occurs.

– Very noticeable difference on 75-mph freeway sweepers; much less body roll.

– In high winds, control was much improved; this should reduce driver fatigue.

– Slow speed roll was also limited, including when entering and exiting driveways.

These were substantial improvements, but it is even more impressive when one remembers my custom Hallmark cabover camper, several hundred pounds of tools and recovery gear, bumper, winch, and 35-inch-tall tires. The Big Wig works, is worth the money, and I’m considering adding Hellwig’s front bar also.

Glad I finally added the Big Wig. Fits and works well.

Tell ‘em you read it on RoadTraveler.net.

James Langan

Copyright James Langan/RoadTraveler. All Rights Reserved

Resource:

Hellwig Products

Dick Cepek Fun Country Tire Review

Fun Countrys walked through every type of terrain with ease.
The Dick Cepek Fun Country

The Dick Cepek brand and the Fun Country tread: the names are icons. Mr. Cepek essentially started the aftermarket industry focused on enthusiast four-wheel-drives in the 1960s. Off-highway tires for the exploding Southern California and Baja desert scene were his initial product, before expanding to include shocks, tire-repair kits, jacks, and the other accessories that backcountry travelers needed and wanted.

At the time, the big rubber companies were content making very narrow and short tires for the OEMs, and were ignoring the burgeoning specialty market. Dick Cepek’s first offering was a farm-implement tread with a DOT rating, the Hi-Way Flotation, made for Cepek by Armstrong.

In 1978 Dick Cepek introduced the first Fun Country, a bias-ply design, which was huge by the standards of the day, 36” tall, 15” wide, made for 15” and 16.5” wheels. The first radial was introduced a couple of years later, and called the F-C.

Modern Versions

Since 2003, Cooper Tires has owned Mickey Thompson and Dick Cepek, but these brands are independently operated, and the relationship predates the acquisition by several years. Also in 2003, Dick Cepek introduced the F-C II, which advanced the cult following of both their brand and their unusual hybrid tread design.

Moderate noise, any-terrain traction, and winter grip have been consistent attributes throughout the generations of the Fun Country. My built and heavy 2011 Tundra project ran a set of 33” F-C II during most of my stewardship and thereafter with the new owner. They were removed after covering 47,065 miles, with 5.5/32” of the original 18/32” remaining, for an incredible 3,765 miles per 1/32” of tread depth.

Dick Cepek F-C II tread wore like iron on my 2011 Tundra.
Comparing the Dick Cepek F-C II (L), and latest Fun Country (R).

The current Fun Country was introduced at the 2012 SEMA Show, where it won a Global Media Award. The tread and construction had been updated and improved, though the heritage was clearly visible, including the unusual shaped sipes (like little seagulls), which I’m convinced are part of the secret traction recipe. It was the first aftermarket tire I put on my 2014 Ram Carryall, which was covered in TDR87 (pages 91-92). They performed well but were removed to make room for larger rubber. After a couple years I circled back to the Dick Cepek Fun Country, choosing the much larger 305/70R18 size, 12.5” wide, and a bit over 35” tall.

More Void, Special Sipes, Premium Construction, Specs

Even a cursory glance at the Fun Country will communicate the traction potential. Not a full mudder, and proportionally less noisy (but not quiet), they offer substantially more void to handle sloppy conditions compared to typical all-terrain designs. The first Fun Country was probably the original hybrid design offered to the enthusiast market (decades before hybrid was in vogue), and the newest Fun Country leans toward the aggressive side of the category.

Fun Country is a high-void hybrid traction tire, but not a full-on mudder.

The Fun Country has copious siping for such a high-void tire, just like the previous versions. Every block has at least one of the unusually-shaped seagull sipes, and the bigger blocks have three. Like the tread blocks themselves, the sipes are placed at various angles, which provides biting edges in nearly every direction when compared to simpler designs.

The compound is more cut and chip resistant than the previous F-C II, all sizes feature three-ply sidewall construction and 18.5/32” of depth. The shoulder Sidebiters™ mimic the tread design; they are a whopping 6/32” deep and also have micro siping! Of course, the Fun Country is M+S rated.

Sidebiters™ mimic the tread design, and are a whopping 6/32” deep.
All sizes have 18.5/32” tread, more than some competitors. 

The 305/70R18 size is a bit wide for an 8-inch-wide wheel; 8.5” is the recommended minimum. I had zero problems with the 305s on factory aluminum 8” wheels, but some shops might balk at mounting this combination. With a load index of 126, and a 65-psi maximum, each tire is capable of supporting 3,750-pounds, with a speed rating of 99 miles-per-hour. My scale said they weigh 71-pounds each.

305/70R18 supports 110# more per tire at 65 psi than the stock 275/70R18 size at 80 psi. 

LT305/70R18 First Spin

Highway manners were excellent at all speeds. The 12.5” wide and 35.1” tall 305s are the tallest and widest rubber I’ve run on my Rams; they did not appear to extract a drivability penalty. The stock wheels keep the tires narrow and tucked under the fenders. There was some minor rubbing on the radius arms at maximum steering lock that removed a little paint (they just barely touched), but this didn’t cause any problems. If the occasional, slight rubbing is a concern, aftermarket wheels are a simple solution. Fourth Generation Rams handle larger tires extremely well. Both Ram 2500 trucks used to evaluate these meats have stock suspensions, not even a so-called leveling kit in front.

On- And Off-Road At GVWR

The 1,400-mile roundtrip highway drive from my home in Northern Nevada, to Flagstaff, Arizona, to attend 2017 Overland Expo West was pleasurable and uneventful. With a truck and camper gross weight of 10,000 pounds, the tires also delivered me to the Southwest for an annual backcountry excursion with a buddy after the show.

Several days were spent exploring and camping in remote places, with hundreds of dirt miles passing under the tread. We started adventuring at Monument Valley, advanced to the Valley of the Gods, and then drove deep into the Manti-LaSal National Forest northwest of Blanding, Utah. It was in this forest that I was able to really test some of the off-highway traction and self-cleaning attributes of the Fun Country.

Off-highway flexing, 25 psi in the fronts with a maximum load.

The trip was in late spring after a wet winter, and we headed for a camp at Deadman Point, 8,700’ above sea level. The shaded spur to this site contained numerous muddy puddles that were from two to several truck lengths long and several inches deep. This was not just a little bit of mud or water; the road often swallowing half of the 35-inch tall tires, submerging my White Knuckle Off Road sliders, scraping crossmembers along the bottom, and packing mud on the differentials.

Chocolate pudding, several inches deep.
Exit on one of the many mud puddles we drove through.

My preferred finesse driving, putting along in low range with minimal fuel from the skinny pedal, combined with the outstanding sloppy traction of the Fun Countrys, pulled me through all of the soft spots. There was no need to spin the tires to help clear the mud-packed lugs after each dunking. They self-cleaned easily at normal trail speeds over the dry sections between the muddy spots.

Leveling the camper at Deadman Point, Manti-LaSal National Forest, Utah. Front tire at 25 psi.

Long-term Wear

Evaluating longevity can be difficult. The same tread can offer vastly different wear on different vehicles, while the driver and conditions are also likely to skew results, often dramatically. My extensive experience evaluating tires on modern diesel pickups provides a solid foundation.

The weight, diesel torque, and manual transmissions on my rigs all contribute to rapid treadwear regardless of what’s mounted. More wear is typically seen on the rear axle, with much less on the front regardless of the brand or design. During the first 2,000 miles logged, including hundreds off-pavement, wear was an equal 1/32” on both axles. The even wear was atypical, but likely reflected the high percentage of highway miles.

To give this set of Fun Countrys a bigger daily driving challenge after duty on the 2014 Carryall crew cab, they were mounted on a 2016 Ram 2500 crew cab that sees much more commuting and personal-use city driving than my outfits. Harder starts, stops, and faster turning, generally contribute to increased wear compared to steady-state, long-distance travel. After another 12,000 miles, for a total of 14,088 miles, they were down an average of 11.5/32” (two at 12/32”, two at 11/32”). Regular rotations kept the wear even, just a hair over 2,000 miles per 1/32”. This is good for the application, duty-cycle, and aggressive tread deign. With the same 2016 Ram and driver, the OE Firestone Transforce HT lost 8.5/32” of their original 15/32” in 9,942-miles, a mere 1,170 per 1/32”!

Swapping the 305 Cepeks onto the second Ram 2500 tester.
These 35” Fun Country treads are a tight fit on stock wheels, but look great and keep a Fourth Generation narrow.
Wearing evenly with about half the tread remaining.

Most light-truck tires are better than in decades past, yet there are still differences in quality and function. The Deck Cepek Fun Country is a premium traction tire, Made In USA by an American company. The LT305/70R18 we tested are $312 each online from tirerack.com, an exceptional value.

The original and still one of the best, Dick Cepek and sister brand Mickey Thompson don’t advertise as much as some of the competition, though their truck tires are better than ever.

James Langan

Copyright James Langan/RoadTraveler All Rights Reserved.

 A version of this article was also published in the Turbo Diesel Register magazine.

Source:

Dick Cepek Tires and Wheels


Hillsboro Series 2000 aluminum flatbed installation videos

Before there could be a Hallmark flatbed model camper, there needed to be a flatbed on my truck. I wanted a readily available and less expensive commercial product, not a custom or semi-custom bed for two or three times as much (out-the-door). After months of research, study, and planning, I decided on the 7′ x 8.5′ Hillsboro Series 2000, and to purchase it and have it installed at Idaho Trailer Sales in Buhl, Idaho.

All of these videos are short.

It took a full day to mount this Hillsboro 2000 Series flatbed and accessories on this 2017 Ram 2500.

Copyright James Langan/RoadTraveler.net

All Rights Reserved.

Resources:

Hallmark Truck Campers

Hillsboro

Idaho Trailer Sales